Most rural and farm family members are aware of potential hazards on farms. But they may not always know what actions to take if they arrive first at a farm accident scene.
The problems farm accident victims encounter often are compounded by other factors. These may include time lapses between the accident and discovery by another person; accident sites that may hinder rescue personnel; long distances accident discoverers may have to travel, sometimes on foot, to seek medical assistance; and the need for discoverers, who probably are untrained in emergency procedures, to make decisions quickly as to what to do first and how much first aid to give before summoning help. More often than not, the shock of the situation hinders an untrained person's thinking and decision-making ability.
Because of these problems, a basic understanding of rescue procedures and first aid methods is extremely important for farm families and employees. Human nature leads us to ignore the possibility that disaster could strike our lives-it always happens to "the other guy." Playing the odds with an accident requiring first aid is not a smart move.
The ability to make quick decisions and take proper action could be the difference between the victim recovering from an accident or having a permanent disability or worse. The first step in preparing for an emergency is for everyone on the farm to take a first aid and cardiopulmonary resuscitation (CPR) course.
The following information gives general recommendations and procedures to follow for the person arriving first on the scene.
SITE ASSESSMENT
BREATHING
If the victim does not respond, call for help. Call out in the hope that someone will hear who can assist or summon a rescue squad.
Always approach a victim from the direction in which he or she is looking. Otherwise, victims may risk further injuries by moving to watch you. You should then put your ear within an inch of the victim's mouth to listen for breathing while you are watching for the rise and fall of the chest. Unconscious persons can lose their ability to keep their airway clear by the normal methods of coughing, swallowing and so on.
If there is absolutely no chance of neck or spinal injury, the head generally can be tilted back to make a better airway. However, always keep the neck and head in normal alignment and do not move the head where it is comfortable for you.
Sometimes people are trapped so that their lungs cannot expand. This can cause suffocation. When possible, anything that prevents normal chest expansion should be removed. An example of providing for chest expansion would be removing earth from below the chest area of someone pinned beneath a tractor or cutting away clothing that is tightly wrapped, as is common in power-take-off entanglements.
Great caution should be exercised not to disturb the balance of the tractor when it could further injure the victim. Tightly wrapped clothing that is not restricting breathing may actually be beneficial by restricting blood loss. Carefully evaluate this potential, especially when an amputation is involved.
BLEEDING
For severely bleeding extremity wounds that cannot be controlled by any other method, the last option is a wide tourniquet, such as a belt, clothing or anything else that is strong and wide enough not to damage the tissues underneath (3-4"). It should be applied snugly 2 to 4 inches above the injury. A thick stick or long slender wrench (screwdriver, ratchet handle) may be needed as a twister to tighten the tourniquet.
All other methods of controlling bleeding should be tried before a tourniquet is applied. Once applied, it must stay snug until the victim arrives at the hospital. Using a tourniquet is an extremely serious choice, since it may mean sacrificing an arm or leg to save a life.
If skin or an appendage has been removed, try to locate the amputated tissue for possible reattachment. However, do not delay the transport of a severely injured victim to look for amputated tissue. It can be sent to the emergency facility after it is found. The steps to follow in an effort to properly preserve amputated tissue are:
ACTIVATING EMS
 Once the situation is stabilized, or if you choose to go for
help before rendering aid, seek help from trained medical professionals
through the Emergency Medical Services (EMS). Even if you are
not sure that medical attention is necessary, it is better to
activate the emergency medical service and later cancel the
request when you are positive they are not needed.
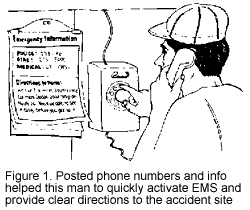
Reporting the emergency yourself from the nearest telephone is probably the surest way of getting the necessary information to the proper authorities. If you are a passerby and are unfamiliar with the area, the person whose phone you are using should be able to give directions. Keep in mind that not all areas have access to 911 services. If you do not know the number, you may have to call for operator assistance (see Figure 1).
If you are alone and a telephone is not available, you may need to find a roadway and flag down a passing motorist. Perhaps a farmer is working in a nearby field. You also could look for a vehicle with a CB antenna and use its radio for summoning help. CB or other two-way radios are common on tractors, and a quick check of the machinery involved in the accident may reveal an operational radio.
KEY POINTS FOR PRE-PLANNING
Location of ambulance and rescue squads. Do not assume all ambulance and rescue vehicles will come from the same direction, or that they are housed together. Know specifically where each person you call is located and have specific instructions for each.
Mileage figures. The only way to be sure of distances you always thought you knew is to check them with an odometer. Emergency personnel may only have mileage figures to guide them, so the figures must be accurate. For a driver who may not be familiar with the area, "about 2 or 3 miles" is poor instruction. When describing turns, say "left" or "right" rather than giving compass directions.
Many in rural areas give and receive instructions with reference to landmarks. Landmarks can be effective guideposts if everyone is aware of them. But some problems that can arise with landmarks are: new people can move into an area; a landmark structure can be torn down; or new subdivisions or roadways can alter traffic patterns away from old, established landmarks. Many rural roads now have road signs. Their use greatly reduces confusion for all involved. For these reasons and more, citing landmarks may not be the best way to give directions. If you do use landmarks, make sure they are well known, easily visible and permanent. They must meet these requirements whether it is day or night and regardless of the time of year.
Critical time can be saved by having someone meet the rescue personnel at the entrance to your farm or another specified point and lead them to the accident site. Be sure the EMS knows of your intentions.
RETURN TO THE SCENE
If you were not alone when you discovered the accident and another person went for help, control blood loss and make sure the victim can breathe. This may be all you should attempt if you are not familiar with rescue procedures. If you try to remove an entangled person from a machine, you may cause even more blood loss or aggravate injuries you cannot see, such as an injured spine or ruptures of internal organs. Removal and rescue should be conducted under controlled conditions by trained personnel.
The most likely reason for attempting to remove a trapped victim is to avoid further injury from a clear and immediate hazard. More probable is a situation where fire or explosion is a possibility, but the odds could be significantly reduced without moving the victim. Recommended actions include turning off the ignition and any other electrical accessories such as lights; keeping fire sources such as cigarettes and flares well away from the area; and disconnecting the machinery's battery ground . If you carry a fire extinguisher, have it on the scene.
Watch for battery fluid leaking onto the victim. Leaking fuel could be channeled or dammed up away from the victim. These methods also could be used to keep battery acid or other dangerous liquids out of contact with the victim. Hot oil from the hydraulic systems or transmission also may pose a problem.
If you have determined that it is necessary to move a victim that you even suspect has a spinal or back injury, keep the midline of the body as straight as possible and pull in a direction that is in a straight line with the victim's spine.
 Pull the body from the feet or shoulders. Use both feet, both
shoulders or both arms pulled over the shoulders. If arms
are used, assess for broken bones. It also is possible to
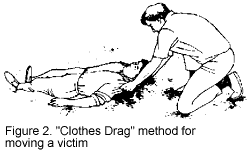
pull by the victim's clothing. Grab the collar of the shirt
and support the victim's head with your forearms while pulling.
The "clothes drag" method is preferred because the head is supported while being moved. Do not pull the body sideways. When providing care, it may be necessary to roll the victim over onto his back to clear an airway or evaluate breathing. When rolling the victim over, the head, neck and torso should be moved together so that no twisting occurs. This can be difficult for one person to accomplish (see Figure 2).
If you do discover someone trapped in or under a piece of farm machinery, realize that each situation is unique. Do not expect miracles from yourself, emergency personnel or anyone else. It is important that would-be rescuers do not become victims themselves, adding complications to an already bad situation.
BE PREPARED
There are a number of first aid and CPR courses available through public service organizations that help prepare you for emergency situations. The intensity of these courses is broken down into three levels: basic, half-day sessions; intermediate, one-day sessions; and advanced, multiple-day sessions.
For specific information, contact your local Red Cross, fire department or local University Extension center.
GENERAL FIRST AID SUPPLIES
PESTICIDE FIRST AID KIT
Publication #: G195
This document is apart of a series from the Department of Agricultural Engineering, University of Missouri-Columbia. If you have special needs as addressed by the Americans with Disabilities Act and need this publication in an alternative format, write ADA Officer, Extension and Agricultural Information, 1-98 Agriculture Building, Columbia, MO 65211, or call (314) 882-8237. Reasonable efforts will be made to accommodate your special needs. Publication date: Reviewed October 1993.
Partial funding for this publication was provided by the University of Missouri-Columbia/National Institute for Occupational Safety and Health Cooperative Agricultural Promotions Agreement U05/CCU706084-01.
David E. Baker and Rusty Lee. Department of Agricultural Engineering, University Extension, University of Missouri and Lincoln University, Columbia, MO 65211.
Disclaimer and Reproduction Information: Information in NASD does not represent NIOSH policy. Information included in NASD appears by permission of the author and/or copyright holder. More