Welcome to the Practical Solutions for Pesticide Safety Hands-on Training Kit
Desponsible en Español
rev. 6/15

Inside this manual you will find all of the supplies needed to conduct four different hands-on training sessions:
- Thermo-wind meter for checking local weather conditions
- Spill containment trays and tubs
- Scrub brush for decontamination
- Ammunition box for storing emergency eyewash
Use these as a short “shop” or “tailgate” safety session or integrate into a more comprehensive training class. Hands-on examples will reinforce two key safety messages associated with each solution and/or your own messages.
The kit contains:
- The Practical Solutions for Pesticide Safety Guide
- Hands-on training supplies
- Safety message posters
- Laminated solutions cards
The training kit manual includes a resource list of supplies, additional background information, training tips, and a DVD with all the print materials in Spanish and English. We hope this kit will inspire you to incorporate solutions into your own training, develop your own hands-on teaching tools, and discover new practical solutions.
Remember… have fun!
~ The PNASH Practical Solutions for Pesticide Safety Team
Contact us with your questions, comments, and feedback!
By E-mail: pnash@uw.edu
By Phone: (800) 330-0827 Jose Carmona, BA or Kit Galvin, MS, CIH
On the Web: http://deohs.washington.edu/pnash
By Mail: UW-PNASH Box 357234 Seattle WA, 98195-7234
We love to hear from you! Your feedback helps us make our educational tools the best they can be!
Supply Reference Sheet
WHERE CAN I GET MY OWN PSPS SUPPLIES?
Amazon.com, Grainger.com, your local hardware store, local farm supply store, local safety supply store, and online safety supply stores carry the items you need to create your own PSPS kit.
What do I need?
- Spill containment trays and tubs
- "Dry Pesticide" (cat food, dog food, or cat litter work well)
- "Liquid Pesticide" (gallon jug filled with water)
- Two plastic dish washing tubs
- Labels for simulated pesticide containers
- Scrub brush for decontamination
- Mid-sized heavy duty scrub brush
- Ammo box for emergency eyewash storage
- 50 cal metal amunition box (painted white)
- 16 oz saline emergency eye wash
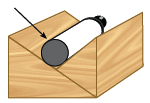
- Cradle for eyewash (2x4 wood painted or sealed before use)
- Chemical protective goggles (compatible with a half-face piece respirator)
- 16 oz water bottle
- Irrigation pipe and caps (to simulate common eyewash container)
- "Eyewash only" and "No tools" labels
Tip: Check Army Surplus stores to get the best price on your ammo box. Keep in mind the boxes do not come in white. You will need to paint it.
Remember!
- Customize solutions and messages to meet your educational objectives.
- Elicit participants’ experiences and stories about the solution or new ideas.
- Share your new ideas and experiences and participant stories with PNASH so that we can expand the kit to include new hands-on training tools.
- Keep fabric posters dry.
SOLUTION: Thermo-wind meter
Check orchard temperatures and wind speed with this hand-held battery-powered meter to find out if weather conditions are correct for spraying on the farm.

ALERT: Turn off tractor and sprayer when reading wind speeds as the air movement form the spray equipment will cause inaccurate readings.
IDEA: A handler uses this solution because he found weather conditions varied between close-by locations and throughout the day.

“I use it every day when spraying...
Weather factors can change anytime when
spraying in the orchard.” ~ Mr. Carbajal
TIPS:
- Water- resistant meters are available at agricultural supply stores and online
Setup & Use:
- Wear clean gloves when holding the meter in the field to avoid contamination
- Check the accuracy of temperature and windspeed readings before each spray session by comparing meter readings to a standard, for example a stationary mercury thermometer or mechanical wind gauge
- Check wind speed in an open area to get an accurate reading. Trees or buildings will affect readings
- Decontaminate meter after each use by following the manufacturer’s cleaning instructions, and do not put meter in water
- Store in a clean, dry place
Research Finding:
In a study looking at pesticide drift, when wind speed doubled, drift increased almost 70% downwind from the sprayer. Montana State University Extension 2008
Training Information: Thermo-wind meter
Key safety messages:
- Check the orchard temperature and wind conditions often.
- Close by weather conditions can change frequently.
The thermo-wind meter was one of the most popular solutions identified by pesticide handlers and managers. During a training session one handler shared his story:
His crop was located within one mile of two different state weather stations that reported different wind speed and direction, and temperatures. He used the thermo-wind meter to decide when it was safe to apply.
Others training participants said that knowing the approximate wind direction would help avoid applying when there was the potential for pesticides to move off target towards other farmworkers or homes.
BEFORE YOU START...
Make sure you have all materials:
- Thermo-wind meter
- Portable electric fan
- Batteries (for the fan)
Suggested participant activity:
- One participant holds a fan blowing in a fixed direction.
- One participant holds the wind-meter upright at different angels to the fan until the maximum wind speed is measured.
- Participants take turns reading wind speed and temperature.
Suggested discussion questions:
- What direction is the wind blowing from and towards? Why is this important?
- Where on the label can you find the temperature and wind speed requirements?
- Bring sample labels for participants to look at.
- What steps can users take to prevent contamination of the thermo-wind meter?
- Wear clean gloves, use outside of the application area, and don’t carry it on the tractor when spraying.
- Where is the best location to use the thermo-wind meter?
- In the open to prevent structural and tall crop interference with the wind.
SOLUTION: Spill containment trays & tubs
Trays and tubs are used to separate liquid chemicals from dry chemicals and to contain spills.
ALERT: Store dry chemicals on shelves above liquid chemicals and store heavier containers on lower shelves.
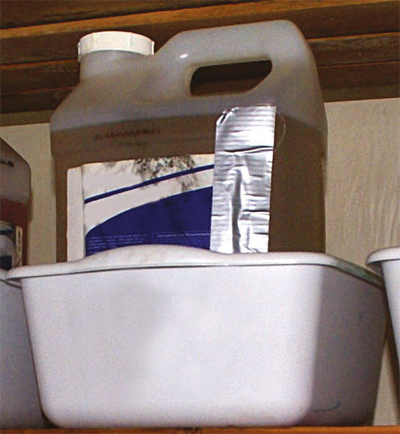
Photo credit: Paul Figueroa, WSDA
TIPS:
- Use WSDA approved signs for labeling chemical storage
- Cat litter can be used as an absorbent and disposed of according to the pesticide label
- Ensure the company spill response plan and training is up-to-date
- Conduct mock spills with non-toxic materials to train handlers how to clean up a spill
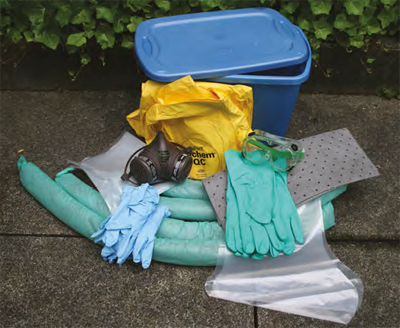
Spill response kit.
Photo credit:
Paul Figueroa, WSDA
Setup & Use:
- Install shelves made of non-absorbent materials such as metal, or covered with epoxy-based paint or a rubber lining
- Select trays or tubs with enough capacity and strength to contain spilled chemicals
- Ensure that the tub or tray material is compatible with chemicals
If you have a spill
- Follow your workplace spill response plan for cleaning up chemical spills
- Wear the PPE as required by the label for the spilled product
- Place each leaky container into a clean tub or tray, clean up the spill, and decontaminate
- Dispose of spilled product and absorption materials (booms, dams, and socks) as hazardous waste
Training Information: Spill containment trays and tubs
Key safety messages:
- Use tubs to contain spills and sepatate Ag chemicals
- Store dry agricultural chemicals above liquid ones.
All farms need to store pesticides with some type of spill containment. Tubs and trays are simple, inexpensive, and easy to purchase. This solution is suited for small farms and small product containers.
BEFORE YOU START...
Make sure you have all materials:
- "Dry Pesticide" (cat food, dog food, or cat litter work well)
- "Liquid Pesticide" (gallon jug filled with water)
- Two dish washing tubs
- Labels for simulated pesticide containers
Suggested participant activity:
This activity fits well with the larger topic of chemical storage and spill cleanup. Hands-on spill cleanup with safe substitutes for the pesticides is an excellent way to reinforce proper spill cleanup.
- Use chairs and tables in the room for pesticide storage at different heights.
- Place the pesticides in the wrong arrangement and without tubs.
- Ask participants to arrange them properly.
- Ask participants about how agricultural chemicals are stored on their farm or where they work.
Suggested discussion questions:
- Why does one store dry agricultural chemicals above liquid ones?
-
You don't want to get liquid on dry products.
- How big does the tub or tray need to be?
- The volume needs to be greater than pesticide container.
- Can you store different pesticides in the same tub or tray?
- No, they may not be compatible.
- Where can you by these tubs?
- Hardware or grocery store
- How long can I store pesticides?
-
Hardware or grocery store.
- How long can I store pesticides?
- One season is best. Buy only what you need. Properly dispose of old pesticides. Check the label and the SDS for disposal information.
-
What else is important about chemical storage?
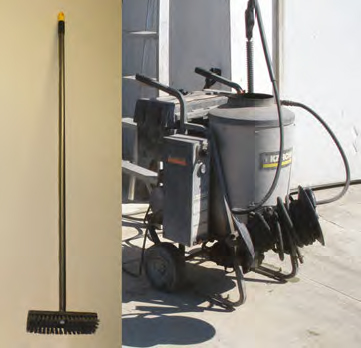
SOLUTION: Scrub brush & pressure washer
Use both a scrub brush and pressure washer for cleaning sprayers and tractors. Pressure washers are especially good for removing dirt and debris from hard-to-reach places on the equipment. Thorough cleaning with scrub brushes provides better overall decontamination.
ALERT: Make sure that the pressure washer is grounded to prevent possible electrocution of the operator
IDEA: The Expert Working Group wanted to know if scrubbing with soap and water or a pressure washers was more effective in cleaning application equipment. They had heard different opinions. The results (see below) show that soap and a scrub brush is more effective. Yet, pressure washing is good for hard-to-reach places.
“A mechanic in the orchard noticed that even after cleaning
the sprayers with a brush, there was still residue in hard-to-reach
spots.... The pressure washer turned out to be a successful idea.” ~ Ms.Schott
TIPS:
- Provide employee training on both proper scrubbing and pressure washer use
- Check oil and gas levels each time the pressure washer is used
- Drain residual water from the pressure washer before storing for the winter
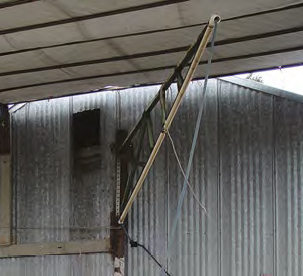
- Install an overhead swinging arm to suspend the pressure washer hose to prevent it from dragging on the ground, creating a trip hazard and collecting pesticide residues
Setup & Use:
- Determine pressure and temperature settings that will clean, but not damage, equipment
- Use the proper eye protection for using a pressure washer and the PPE required by the pesticide label
- Rinse equipment with the pressure washer to remove dirt and debris, especially in hard-to-reach places and mechanic access points, to reduce exposure to those repairing equipment later
- Scrub equipment with brush, soap, and water
- Rinse with hose or pressure washer

The scrub brush and soap cleans the spray tank thoroughly (left). The targeted
pressure washer spray misses large areas of the spray tank (right).
“I like to clean with the swinging arm system. I can clean the
equipment better, which also helps with greasing and repairing.” ~ Mr.Torres
Research Finding:
Only 10% of handlers were properly maintaining or washing spray equipment in a study of suspected pesticide-related illness cases in Washington state over 2003- 2008. Washington State Department of Health 2010
Training Information: Scrub brush for decontamination
Key safety messages:
- A scrub brush is best for decontamination.
- A pressure washer is best for general cleaning and hard to reach places
The pesticide handlers and managers who were members of the Practical Solutions for Pesticide Safety Expert Working Group wanted to know if a scrub brush or a pressure washer did a better job of cleaning application equipment. They asked if we could do a test to find out the answer. So we did the test using fluorescent tracers. (See the description of fluorescent tracers below.)
BEFORE YOU START...
Make sure you have all materials:
Suggested participant activity:
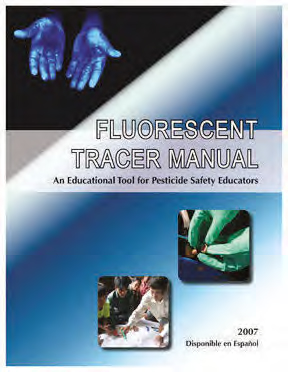
- Explain how fluorescent tracer works. Fluorescent tracers mimic pesticides; you can’t see either one on equipment, clothes, or your body when you are in regular light. Under a special “black light” the fluorescent tracer glows. The glowing tracer mimics pesticide residue on equipment, clothes, and body.
- Explain the study. To mimic pesticides, fluorescent tracers were evenly applied to the side of an airblast sprayer tank. A pesticide handler cleaned the two areas blocked by tape, using a standardized pattern, based on how he decontaminated his sprayer. On one area he used a scrub brush, on the other he used a high-pressure spray washer.
- Ask participants to vote for which one, the scrub brush or the pressure washer, did a better job of cleaning the tank.
- Explain that the scrub brush did the better job. (In the photo above, the left side shows results from using a scrub brush and right side shows results from using a pressure washer.)
- Pass around the scrub brush for participants to get an idea of what they should be using.
Suggested discussion questions:
- Why do you think the scrub brush did a better job?
- When would you want to use a pressure washer?
- To remove dirt and debris and to reach places that you cannot get to with a scrub brush.
- What personal protective equipment should you wear when decontaminating equipment?
- When should the application equipment be decontaminated?
- Who might be exposed to pesticide residue if you do not decontaminate the equipment?
- Farmworkers, farm visitors, and mechanics
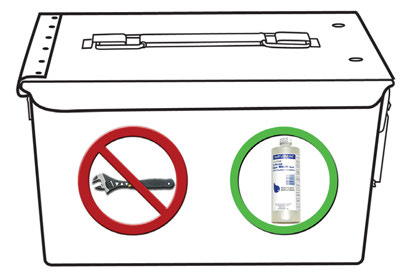
SOLUTION: Ammunition Box to Store Emergency Eyewash
This box provides clean storage for the personal eyewash bottle. It is readily available and easy to open in an emergency.

ALERT: The eyewash water could become too hot to use if the box is located near the motor or transmission or is exposed to the sun for long periods.
IDEA: A manager thought of using an ammunition box when he saw the ammunition box on the tractor for storing tools. The PVC pipes he was using before had lids that would stick and be hard to remove in an emergency.
TIPS:
- Replace eyewash before the expiration date on the bottle
- Keep the eyewash from getting too hot:
- Consider a plastic ammo box
- Paint the box white to reflect heat
- Attach the ammo box to the tractor with a bracket to keep it separate from the hot tractor, especially the engine.
- Provide a “cradle” to keep the bottle from moving
Setup & Use:
- Buy an ammunition box that is wide and shallow enough for handlers with large hands to reach inside
- Attach the box on the tractor in a location that is easy for the applicator to reach within 10 seconds at all times
- Make sure the box does not interfere with normal functions of the tractor or driver
- Label the box with symbols for “Emergency Eyewash Only” and “No Tools”
- Check the box to make sure lid is operating properly and emergency eyewash is full and sealed before each application
- Use the entire bottle to rinse eyes. Complete the 15-minute minimum rinse at the eyewash station
Investigation Finding:
One out of every 20 WPS violaitons from 2007 to 2009 were for not providing a pint of emergency eyewash immediately available to the handler. PNASH, Jansen 2010
Training Information: Ammunition box to store emergency eyewash
Key safety messages:
- Wear chemical protective goggles when handling pesticides.
- Keep emergency eyewash in an easy in an easy to reach location.
We observed the irrigation pipe with screw-on caps for eyewash storage on several farms. One farm that was part of our practical solutions study demonstrated their irrigation pipe emergency eyewash container attached to a tractor…they could not unscrew the cap, it was stuck! At another farm we saw an ammunition box used for storing the emergency eyewash. It was easy to open with one hand. We made some recommended modifications to better protect the eyewash bottle from heat and damage.
BEFORE YOU START...
Make sure you have all materials:
- 50 cal metal ammunition box (painted white)
- 16oz saline emergency eye wash
- Cradle for eyewash (2x4 wood painted or sealed before use)
- Chemical protective goggles (compatible with a half-face piece respirator)
- 16oz water bottle
- Irrigation pipe and caps (to simulate common eyewash container)
- "Eyewash only" and "No tools" labels
Suggested participant activity:
- Which container was easier to open? Which container could you open with one hand?
- Why is it important to use emergency eyewash bottles and not drinking water bottles?
- Emergency eyewash bottles are sealed and contain a water solution that is sterile and adjusted to be more comfortable in eyes. The opening is smaller to control the flow. People will not be tempted to use the bottle as drinking water.
- What can you do to prevent splashes in the eyes?
- Wear chemical protective goggles that fit the face. If earing a repirator, use a full face-piece or wear goggles that fit snuggly around a half-face piece respirator, like the pair in the kit.
- What types of protective eye wear do not adequately protect the eyes from pesticide or chemical splashes?
- Safety glasses and face shields. Wear goggles with the face shield.
- What would be a good location on the tractor to attach the box? What would be a poor location?
- A good location is easy to reach, away from a hot engine.
Additional Resources
Where can I find additional Pesticide Safety Resources?
Want more pesticide safety training tools from PNASH?
Learn about our Fluorescent Tracer Kit, a hands-on tool for providing training to pesticide applicators.
Visit deohs.washington.edu/pnash/fluorescent_tracer


Pacific Northwest Agricultural Safety and Health Center
http://www.deohs.washington.edu/pnash/
(800) 330-0827 pnash@uw.edu

Disclaimer and Reproduction Information: Information in
NASD does not represent NIOSH policy. Information included in
NASD appears by permission of the author and/or copyright holder.
More