Version 1 - 10/2013
Instructions
This sample program is provided to assist you as an employer to meet the Logger Safety Initiative Accident Prevention Program requirements. The content of this program must be used. However, we encourage employers to add their company specific policies to this program.
(1) A worker may not work as a cutter in a logging operation unless;
(a) the worker receives training for cutting that meets the training requirements in section (2), and an experienced cutter certifies in writing that the trainee has successfully completed the training requirements, or
(b) meets the requirements in section (4) and an experienced cutter certifies in writing that the cutter’ experience satisfies training requirements.
Note: This section does not apply to workers who occasionally fall trees such as the falling of guyline trees or tail trees, but the employer must meet all other training requirements in the Safety Standards for Logging Operations Chapter 296-54 WAC.
“New cutter”: cutter with less than 150 working days of experience as a timber cutter.
(2) New cutter training must include the following:
(a) Receive basic training in falling and bucking by working one-on-one with an experienced cutter (trainer) until the trainer determines that the trainee cutter is qualified to work independently under close supervision, but must be a minimum of 30 working days.
(i) Basic training must include completion of the Cutter Training Curriculum and a review of the policies and procedures listed on the Employee Safety Orientation Training Record form in this Accident Prevention Program document.
(b) After completion of basic training under paragraph (a), a trainee cutter must be evaluated on a weekly basis by an experienced cutter for a minimum period of 120 working days.
(c) A training log (see Appendix 8) for the basic training and supervision period must be maintained by both the trainer and the trainee.
(i) The training logs must include the dates of training/supervision, and the name and signature of both the trainer and trainee.
(d) If a new cutter’s employment ends prior to completing the basic training and or the supervision period, a subsequent employer may accept prior training that is properly documented on the training logs. If accepted by a subsequent employer, the trainee would only need to complete the remaining minimum training requirements.
(3) If, at the end of the training and supervision period, the trainee's cutting is consistent with the safe work practices included in the Cutter Training Curriculum, the experienced cutter will certify in writing that the trainee has successfully completed the training requirements.
(a) The Logger Safety Program Cutter Safety Audit Form (see Appendix 7) must be used to evaluate whether a cutter has successfully completed training and as a certificate of training. A completed copy of the Cutter Safety Audit Form must be maintained by the employer and a copy must be provided to the cutter.
(4) Subsection (2) does not apply to a cutter who satisfies all of the following requirements:
(a) A cutter has performed falling duties regularly for at least 150 working days before the evaluation under paragraph (b) of this subsection takes place; and
(b) An experienced cutter evaluates the cutter’s work practices and determines that the cutter is performing the job in a manner that is consistent with the safe work practices included in the Cutter Training Curriculum. The experienced cutter will certify in writing that the cutter’s experience satisfies training requirements.
(i) The Logger Safety Program Cutter Safety Audit Form must be used to evaluate the cutter’s work practices, determine whether a cutter has satisfied training requirements, and as a certificate of training. A completed copy of the Cutter Safety Audit Form must be maintained by the employer and a copy must be provided to the cutter.
This company places a high value on the safety of its employees. We are committed to providing a safe workplace for all employees and have developed this program for injury prevention to involve management, supervisors, and employees in identifying and eliminating hazards that may develop during our work process.
It is the basic safety policy of this company that no task is so important that an employee must violate a safety rule or take a risk of injury or illness in order to get the job done.
Employees are required to comply with all company safety rules and are encouraged to actively participate in identifying ways to make our company a safer place to work.
Supervisors are responsible for the safety of their employees and as a part of their daily duties must check the workplace for unsafe conditions, watch employees for unsafe actions and take prompt action to eliminate any hazards.
Management will do its part by devoting the resources necessary to have a safety program that is effective in practice. We will develop a system for identifying and correcting hazards. We will plan for foreseeable emergencies. We will provide initial and ongoing training for employees and supervisors. And, we will establish a disciplinary policy to ensure that company safety policies are followed.
Safety is a team effort – Let us all work together to keep this a safe and healthy workplace.
(Customize by adding any additional policy items that you may have and/or deleting any that do not apply to your company.)
___________________________________
Owner’s Signature
We believe that a accident prevention program is unenforceable without some type of disciplinary policies. Our company believes that in order to maintain a safe and healthy workplace that the employees must be cognizant and aware of all company and state safety and health regulations as they apply to the specific job duties required. The following disciplinary policy is in effect and will be applied to all safety or health violations.
(Note: A formal disciplinary policy, such as the following 3 step policy, or a less formal policy found below could be implemented. You may voluntarily choose to use one of the policies in the current form or with changes.
The following steps will be followed unless in the unlikely event that the seriousness of the violation would dictate going directly to Step 2 or Step 3.
OR
Any violation of this accident prevention program or applicable state safety standard may result in disciplinary action or termination.
The underlying cause of many logging accidents is lack of safety training. Safety training is concerned primarily with helping the employee develop the needed skills and abilities to use equipment and/or perform a procedure. Training is required to be provided by a competent and qualified person. A competent and qualified person is defined in WAC 266-54-505.
Safety must be taught before the employee is exposed to the hazards of the job.
The following training curriculum must be used and thoroughly explained to each employee involved in cutting timber. The primary purpose of the curriculum is prepare you to work in the safest possible manner, so that you go home safely each and every night.
There are several rules of thumb that you should always keep in mind:
Head Protection – High visibility hard hats must be worn to protect against head injuries from falling, flying or thrown objects. The hard hat should be in good condition. If a plastic hard hat is cracked, deeply scratched, or brittle, replace it. If an aluminum hard hat is damaged replace it.
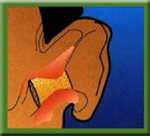 Hearing Protection - Hearing protection must be worn properly and in good condition. Earplugs must be properly inserted to be effective (see illustration). Hearing protectors act as a barrier to reduce sound entering the inner ear. They may be uncomfortable at times and take some getting used to. But wearing them is your best insurance for hearing well in the future.
Eye Protection - Employees must wear approved eye protection when operating chain saws. The most common eye protection used is safety glasses and logger-type mesh screens
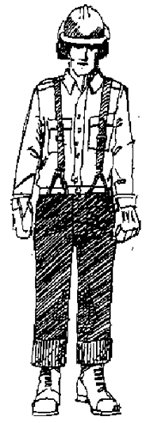 Leg Protection - Leg protection is mandatory when operating a chainsaw. In cases of saw kickback, leg protection can prevent serious injury. Leg protection must be made of a cut- resistant material, such as ballistic nylon, and must cover the full length of the thigh to the top of the boot on each leg. Leg protection must be replaced if the cut-resistant material has been damaged. Leg protection can be worn over your pants (chaps) or under your pants (inserts). Both types must be properly secured so they stay in place.
Hand Protection - Employees handling rough materials must wear gloves. Gloves will protect against cuts, lacerations and puncture wounds.
Foot Protection
Highly visible clothing
 Lift smoothly and slowly and never jerk the load. Avoid twisting while lifting and bending forward because it places additional compressive forces on the spine and can cause back ligaments to be overstretched. When carrying a load or repositioning a load, be careful not to twist your body. Turn your body by changing the position of your feet.
Work areas must be assigned so that:
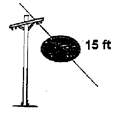
A minimum of fifteen (15) feet of clearance should be maintained between the electrical distribution line and all trees being fell. Contact the utility company before working near power lines where you are not absolutely sure of voltages and clearance requirements or need assistance in removing trees along power lines. Trees along power lines must be directionally fell away from the lines. If a tree contacts a power line, all employees must remain clear of the area until the power company ensures that there is no electrical hazard.
We believe there is no magic formula for the prevention of injuries – hard work and perseverance are required, with the effective safety meetings being the key to a successful result.
Purpose:
To assist in the detection and elimination of unsafe conditions and work procedures. Keep lines of communication open to address safety issues.
Procedure:
The following guidelines will be followed:
Documentation:
A form is available in the Appendix 3 to assist in documenting safety meetings.
We have first aid qualified workers but we do not have "designated" first aiders. First aid at the job site is done on a Good Samaritan (voluntary) basis. A patient’s body fluid may carry diseases such as HIV and Hepatitis. If you choose to provide first aid, you should protect yourself from exposure to blood and body fluids by the use of barriers. Appropriate barriers may include protective gloves, mouth barrier and eye protection. If you are involved in a situation involving blood and/or body fluids, you should:
Employee ___________________
Date ________________
Trainer ________________
This checklist is a guideline for conducting new employee safety orientation. The following policies and procedures must be explained before a new employee begins work. Place a check in each box to indicate that the subject has been covered.
__ 1. Review “Safety Policy & Commitment” section
__ 2. Review ‘Safety Disciplinary Policy” section
__ 3. Review “Safety Responsibilities” (Employer, Supervisor, Employee sections).
__ 4. Review “General Safety Information and Rules” section including:
__ 5. Review “Safety Meetings” section
__ 6. Review “Injury or Illness Procedures” section.
__ 7. Review “Blood Borne Disease Exposure” section.
__ 8. Review Hazard Communication Program (see written program).
__ 9. Review Outdoor Heat Exposure Safety Program (see written program).
__ 10. Explain the process for training “new cutters” and experienced cutters.
I have received and understand the above information:
Employee's signature ____________________
Date: ________________
Cutter’s Name:
Trainer’s Name(s):
I have received and understand the information listed below:
Cutter’s signature:
Date:
After the trainer explains the information, place a mark in each box below. Many of the categories also require the trainee to demonstrate their ability to correctly perform the technique(s). Do not check the box until the trainee has demonstrated that he can perform the technique(s) correctly.
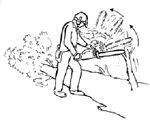 Cuts are the most common type of injury caused by chain saws. They can range from minor hand injuries, while filing the chain, to major amputations or death. Cuts can occur if you slip or fall and accidentally touch the chain. The most serious cuts are caused by kickbacks. A saw can "kickback" with surprising force in less than 1/5 of a second. There is no time to react and, if you're poorly positioned, the resulting injuries can be severe.
Cuts can be reduced by following these safety guidelines:

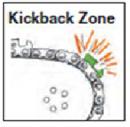 Remember, the tip of the bar causes most kickbacks. Know where the tip of the bar is at all times, especially when bucking and limbing.
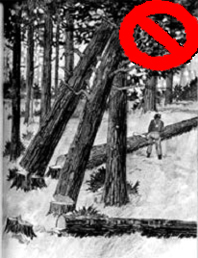 Lodged trees must be clearly marked and identified by a predetermined method and all persons in the area must be instructed not to pass or work within two tree lengths of the trees except to ground them.
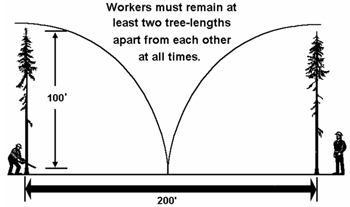
Falling and bucking difficulties. During the course of a work day a cutter can encounter situations that may be considered "difficult." It could be a problem snag, an extreme leaner or a jackpot. With experience, skill and imagination most of these situations are resolved. However, cutters must never overestimate their ability.
In difficult situations assess the problem carefully. Consider the complications and the alternatives. If there is any doubt as to how to get the job done safely, don’t do it. Stop and ask your supervisor or another cutter for advice and/or help.
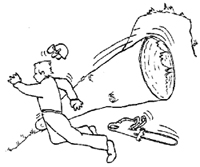 Where felled trees are likely to roll and endanger workers, cutting must proceed from the bottom toward the top of the slope, and uphill from previously felled timber.
 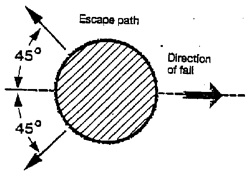 Plan your escape route and an alternative route in case the tree does not fall according to plan. Choose and clear out an escape path in back of, uphill and at an angle away from the stump. Your escape path must allow you to move at least 10 feet from the stump.
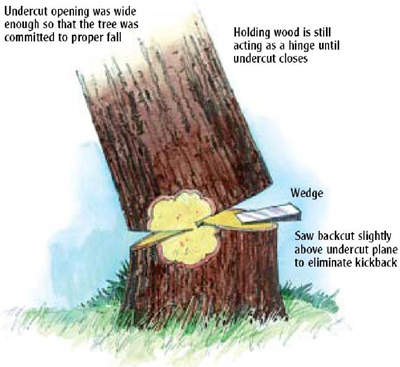
The key to good falling is the undercut. When properly sawn, the undercut will allow the tree to fall freely in a chosen direction. More time spent on a good undercut will avoid many problems later. A clean, uniform undercut must be used on all trees.
 The following guide should be used:
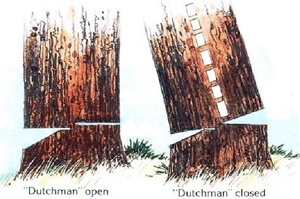 An unintentional Dutchman is created when the horizontal cut extends past the sloping cut. The result of unintentional "Dutchman" is that, as the tree starts to fall, the "Dutchman" closes, usually breaking the holding wood and forcing the tree away from its intended direction of fall.
The tree may "barber-chair" or fall among other adjacent standing trees or snags and hang-up. Broken tree limbs or tops may be thrown back toward the cutter in this case.
All trees will barberchair, but the following species should be the most suspect:
Make sure that you are always cutting with a sharp chain so that you can complete the backcut as quickly as possible.
Many accident investigations have determined that an unintentional "Dutchman" was a contributing factor to the accident.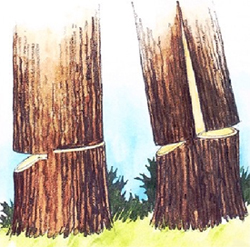
Causes of "Barber-Chair"
An intentional "Dutchman" has been used by cutters to overcome some falling problems. When a tree could not be "pulled" or "thrown" by other means, cutters have used an intentional "Dutchman," but only after understanding and evaluating the hazards involved. Even for the most seasoned and skillful cutter, the amount of pull or throw created by the "Dutchman" cannot always be determined. This could mean losing control of the tree. For this reason, the use of an intentional "Dutchman" is not recommended, except under special conditions.
 Where possible, danger trees must be felled:
Danger trees that will reach the work area should be fell as soon as an opening will permit it. Don’t overlook danger trees along cutting lines or in leave areas. If it is unsafe to hand fall a danger tree, your supervisor must prearrange other methods such as the use of explosives or machinery, so you don’t have to bypass a danger tree. Avoid wedging a danger tree as it may break off or material may fall. Fall danger trees in the direction of lean whenever possible.
Avoid "pushing" a danger tree, other than to overcome a falling difficulty. The top may break off or the danger tree may buckle in the middle and fall in your direction. The whole danger tree could sway and fall back onto the faller. Never push a danger tree with another danger tree. Most danger trees can be felled progressively with other timber.
 A cutter must not fall a danger tree or snag alone when at least two persons are necessary to minimize hazards.
As a cutter, it is imperative that you be able to identify danger trees in your surrounding work area that would create a hazard. Because timber fallers are usually the first workers to approach a danger tree or snag during the harvest activity, they are at greatest risk of having an accident.
Danger tree is defined as (WAC definition in the Safety Standards for Logging Operations): Any tree of any height, dead or alive, that poses a hazard to workers because of rot, root, stem or limb damage, lean, or any other observable condition created by natural process or man-made activity.
 Some trees, although dead, may not be a danger trees if they have a sound top, trunk, and roots. Identifying these dead but safe trees requires careful observation. Mortality may have been caused by canker, diseases, insects, fire, adverse weather or lightning. Needle and small twig retention is evidence of recent death, which may be an indicator of stability. Fire-scorched trees may remain stable for many years if the trunk and root systems are not badly burned.
However, not all fire-scarred trees may be safe. Pre-existing defects may be charred and difficult to detect, rendering a tree that was dangerous before the fire even more dangerous afterward.
If the fire burned the root system, it may be damaged, and need to be classified as a danger tree. Similarly, trees infected with root rots have weakened root systems that automatically classify them as a danger tree. Root disease pockets can be identified by looking for trees with fading crowns that are adjacent to windthrown trees with root decay. The windthrown trees will usually have very small root balls.
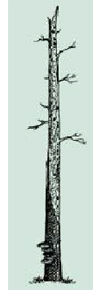 Danger trees could also be live or dead trees with unstable tops or upper portions. Although the roots and main portions of the trunk are sound, these reserve trees pose high hazard because of defect in live or dead wood higher up in the tree. Ground vibration from falling trees, wind, flying debris, heavy equipment or other industrial activity can dislodge slabs, chunks, limbs, or the entire upper portion of the tree.
Danger trees could also be live or dead with unstable trunk or roots, with or without bark. This includes “soft” snags as well as live trees with unstable roots caused by root rot or fire. They are considered the most dangerous type. Unexpected collapse could occur from any portion of the roots or trunk.
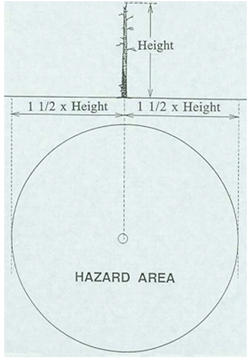
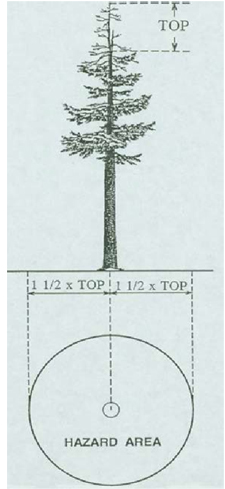
If the intent is to leave a danger tree in a logging unit, then workers must remain a safe distance away. A safe distance would be outside the potential hazard area of the danger tree (see examples below).
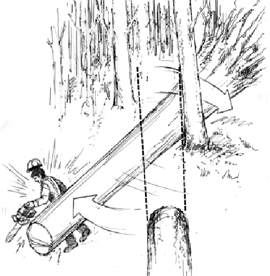
Tree sits back. Just as the cutter is completing the backcut, the tree starts to sit back on the bar. This can happen because:
If enough holding wood remains, the tree can still be wedged over in its intended direction. Be sure to clean the bark away above and below the backcut, to allow wedges to bear on solid wood.
Sometimes the tree may be leaning backwards heavily and you can't start wedges in the backcut. In this case, you have three choices:
 Re-Fall the Tree. If you decide on option one through three, then you must take extra care when working on the cut-up tree. Also, because the falling plan has now changed, you must clear another escape route before starting to cut again. The best way to do this is to face the cut-up tree and brush-out the escape route toward it, always keeping an eye on the tree in case it starts to fall. Never Turn Your Back on a Cut-up Tree!
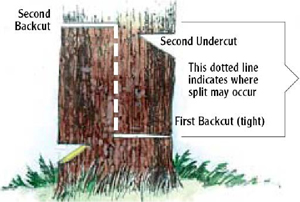
After the escape route is cleared, you can then begin re-falling the tree using a second undercut.
There are different methods that could be used, however the following method will allow for most control being maintained because a proper undercut, backcut and holding wood can be sawn in above the original cuts. Maintain the vertical distance between the first falling cuts and the new falling cuts to at least the distance of the tree's diameter. A danger exists that a vertical split can occur between the first and second set of cuts.
"Pushing" is dangerous because a gust of wind or vibration from nearby equipment can cause the cut-up tree to fall in an unexpected direction. If the cutter only brushes the tree being pushed, that tree may sway and fall over into the area where the cutter is standing. Also, dry tops or limbs can be broken off and thrown back toward the cutter.
Guidelines for "Pushing" Trees:
Most trees have some lean. If the lean is slight and in the same direction as the falling face opened up, falling is straightforward. However, if the tree is leaning heavily, or must be felled against the lean, the situation is more hazardous and requires special consideration.
 A tree with a heavy lean develops enormous tension in the wood directly behind the lean. When an undercut is sawn into the tree in the direction of the lean this tension increases. As soon as a conventional backcut is started, the tension is immediately relieved and the tree starts to fall. However, too much holding wood remains and, instead of the holding wood breaking off normally, the tree trunk will split vertically from where the backcut was started. A huge slab will develop and kick backward at the same time, causing a "barber- chair." This whole process can take only a few seconds. The results can be disastrous for an unprepared cutter.
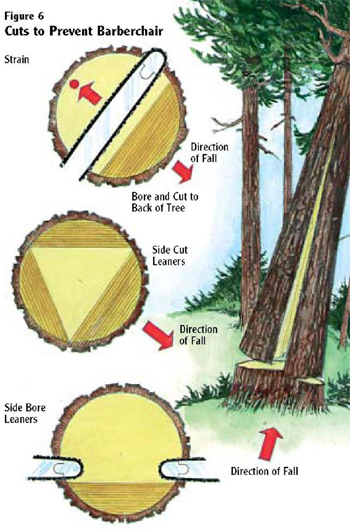
In falling heavy leaners, do not attempt a deep undercut. The undercut should be no more than one-quarter of the tree's diameter. To prevent barber-chairing, leave the part of the wood which is most under tension, located behind the lean, until more of the holding wood is sawn out. Two methods may be used in removing the excess holding wood.
Side-notching. After the undercut block has been removed, the sides of the tree are sidecut or sidebored. The remaining holding wood of the backcut will be sawn faster, with less likelihood of the tree splitting.
Boring the backcut. After the undercut block has been removed, the tip of the saw bar is bored into the tree above the horizontal plane of the undercut. The faller must ensure that they leave a few inches of holding wood between the start of the boring cut and the back of the undercut. It may be necessary to bore in from both sides if the tree is wider than the length of the bar.
The saw is worked backwards, cutting from the inside out, until the point is reached where the normal backcut would have been started.
While boring, the wood directly behind the lean will be under enormous tension, as all other holding wood has been severed. Trees have been known to fall before the saw has cut through, pulling a large section of root out of the ground.
For extreme leaners and leaners with splits in the butt, the faller is advised not to bore through the butt. The bar will get struck in the super-compressed, tensioned or split wood of the butt.
Those types of leaners can be extremely hazardous. The following is a procedure to deal with them:
If the tree is too hazardous to be felled with the above procedure, an alternative method, such as blasting, should be used.
On occasion, falling against the lean may be necessary to:
Making strict guidelines for falling a tree against its lean is difficult because of the variations in lean, height, diameter, species, terrain, and conditions. In extremely cold weather, for example, frozen wood becomes brittle and undependable as holding wood. Falling against the lean under these conditions is hazardous.
Make a habit of plumbing each tree before falling, even if you feel sure you know where the lean is.
A large tree with heavy lean may be felled against its lean by inserting wedges in the kerf of the backcut and driving the wedges alternately as the backcut is sawn. In some cases, a hydraulic jack used in conjunction with wedges would be an advantage. Always use eye protection when driving wedges. Keep your head above the wedge or away from its path should the wedge come out of a cut.
Most trees can be felled away from their lean by using normal falling wedges and by keeping extra holding wood.
 On small timber, there may not be enough room for the saw bar and wedges.
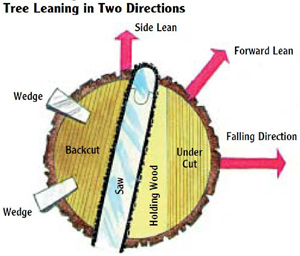
In some cases the tree may be leaning in two directions (see illustration). Be careful not to cut off the holding wood on the leaning side; the tree may settle on the saw bar. More holding wood is maintained opposite to any side lean. This will help draw the tree away from any side lean.
Hydraulic jacks can be used to solve a variety of falling difficulties. A jack (or jacks) may be necessary to lift and force a large tree against its lean.
Points to Remember:
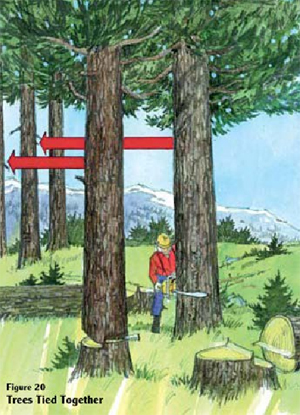 __ Trees Tied Together – Explained and demonstrated correctly
 Trees standing close together and tied in by limbs should be felled together (see illustration). If the cutter cannot see all the limbs they must assume the trees are tied together and, therefore, should be felled together. Under such conditions, if wedges are used to drop the front tree, a limb or dry top may break and fall, endangering the cutter.
Procedure
Each situation of this kind must be carefully considered. If it appears particularly hazardous, talk with your supervisor first.
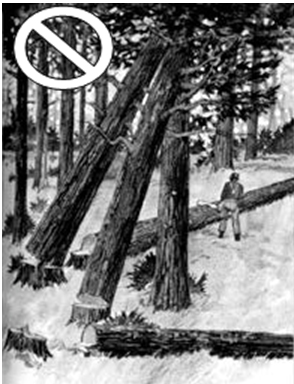 Many fatal-accident investigations reveal that the fallers involved had created "hang-ups" in their area. They were working under one of these hang-ups when struck by it.
Hang-ups are caused by:
Losing control of the falling tree can be caused by:
If trees are hung-up in another tree, special care must be taken when falling the tree supporting those that are hung-up.
Man-made hang-ups can be prevented by careful planning and the use of proper felling techniques.
 __ Windfalls and windfall roots - Explained
 Windfall roots should not be approached from the root wad side. Avoid standing directly behind or downhill of a root wad. Never assume that a windfall root wad is safe because it has been down for a long time. It may still flip over unexpectedly. When bucking off a root wad, leave a short log on the root wad to prevent it from tipping toward you.
Falling and bucking burned timber requires extreme caution. Roots of some trees could be burned off or they may have burned out centers. The trees may fall as soon as they are exposed to wind. The falling face should be kept straight.
Bark may be loosened by fire and fall unexpectedly. Walking on burned logs is more dangerous because support limbs may be weakened or partly burned off. Burned holes and exposed roots create additional tripping hazards. Large rocks, long butts and chunks may roll downhill after fire has undermined their support.
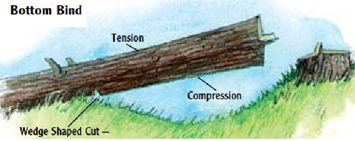 Bind can be expected in most felled trees. Bind is made worse by uneven terrain and other material already on the ground. Bind can be present in combinations of top and side bind, or bottom and side bind.
Many serious accidents have occurred because cutters failed to recognize side bind while bucking. They positioned themselves on the side to which the bucked log "sprung" or swung upon release. When safe, buck from the side that is away from the bind, and take out the bind at the safest spot along the tree/blowdown.
The best defense a cutter has to avoid injury and equipment damage is to examine the felled tree carefully. Determine any bind which may be present and what will happen when the bucked log is released. In general, you should start by cutting compression wood and finish by cutting the tension wood. A wedge shaped cut may need to be made if the tree is under a heavy bind.
 __ Pivot Points - Explained
 A pivot point is any feature on the ground that may cause a falling tree or log to react in an unexpected manner. Pivot points can be stumps, rocks or any protrusion that affects a log's balance or natural tendency to roll. They're usually encountered in bucking and can be dangerous if not recognized.
As a bucked log is released, an unseen pivot point could cause one end of the log to slide or roll downhill and the other end to move uphill. If the cutter hasn't noticed the pivot and planned accordingly, they could be seriously injured.
Boring is useful in certain specific situations when falling heavy leaners, for example, or in bucking where there is excessive bind. However, boring can be dangerous. If proper procedures aren’t followed, boring can cause severe kickback.
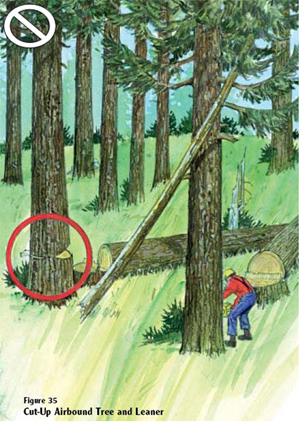
Points to Remember:Many investigations of fatal accidents reveal that the fallers who were killed had numerous cut-up trees in their working area. The "cut-ups" were sitting back on a wedge or on the stump until one of them came down unexpectedly.
Cut-up trees are death traps. They can be felled by:
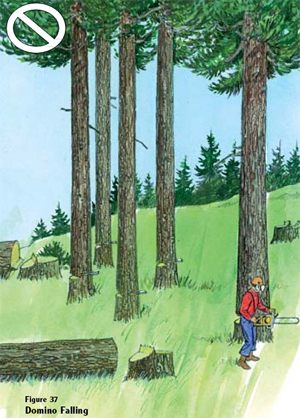
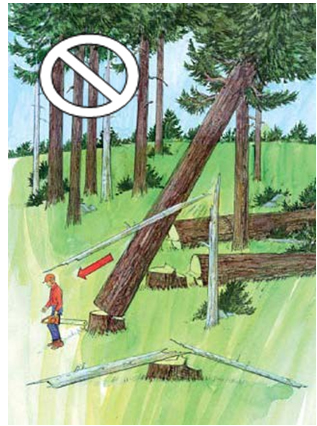
Domino falling is an extremely dangerous work practice. Usually confined to small timber, it has taken many lives in the logging industry. Domino falling of trees, including danger trees, is prohibited. Domino falling does not include the falling of a single danger tree by falling another tree into it to overcome a falling difficulty.
Domino felling is defined as the partial cutting of multiple tree which are left standing and then pushed over with a pusher tree.
Accident investigations have revealed that, in some cases, cutter had several trees cut up and left standing. In each case, the cutter intended to push the cut- up trees over with a pusher tree. Unfortunately, one of the cut-ups came down unexpectedly.
In some cases, the cut-up tree came down and killed the cutter before the cutter was able to drop the pusher tree. In others, the pusher tree caused one or more of the cut-up trees to fall back on the cutter. Domino falling is dangerous. Don't do it. Don't condone any fellow worker who uses domino falling.
Purpose:
The purpose of the Hazard Communication Program is to ensure that the hazards of all chemicals produced or imported by chemical manufacturers or importers are evaluated, and that information concerning their hazards is transmitted to affected employers and employees before they use the products.
Procedure:
Employees must be made aware of where hazardous chemicals are used in their work areas. They also must be informed of the requirements of the Hazard Communication Standard, the availability and location of the written program, the list of hazardous chemicals, and the material safety data sheets.
The safety and health regulations specifically requires employers to train employees in the protective practices implemented in their workplace, the labeling system used, how to obtain and use MSDS's, the physical and health hazards of the chemicals, and the recognition, avoidance and prevention of accidental entrance of hazardous chemicals into the work environment.
General: It is our policy to provide and maintain a safe and healthy workplace for all employees including those who work with potentially hazardous chemicals.
If you work with or around potentially hazardous chemicals, this program affects you. The Hazard Communication Standard is intended to inform you of any potential chemical hazards from products you may come in contact with at the jobsite.
Container Labeling:
All containers of chemical products received at this company, and all containers used as secondary containers, will contain a label listing their hazards, both physical and health hazards. If the label is missing, contact (Add name or title of responsible person here) so that he/she may determine what the product is that has been received, and where it should be stored. DO NOT ATTEMPT TO USE ANY CHEMICAL THAT IS NOT READILY IDENTIFIABLE.
Material Safety Data Sheets (MSDS):
(Add name or title of responsible person here) has the MSDS on file from the various chemical manufacturers for all hazardous chemicals used in connection with this workplace. The MSDS sheets list information available about any particular chemical: health hazards, emergency and first aid procedures, how the chemical could enter the body, the safe handling and use of the chemical, name of the manufacturer, etc. The The MSDS file may be found in these locations:
Employee Information and Training:
(Add name or title of responsible person here) will provide training to all employees and new hires on the proper use of hazardous chemicals and potential hazards. They will be responsible for providing the following informational training to all employees:
Hazardous Materials Inventory List:
Note: Hazardous chemicals include such things as: diesel, gasoline, motor oil, bar oil, 2 cycle oil, etc.
1.
2.
3.
4.
5.
6.
As your employer, we are responsible to determine whether we have employees who may work under conditions that increase the risk of developing heat related illness. The main environmental factors include: air temperature, relative humidity, radiant heat from the sun, conductive heat sources such as the ground, air movement and workload severity and duration. Generally, any employee who works in moderate to high temperature and/or humidity conditions, and performs physical activities that elevate the heart rate and/or causes increased perspiration, needs to be prepared for potential heat related illness. This includes jobs such cutting timber. As an employee, you are responsible for monitoring your personal factors for heat-related illness including consumption of water or other beverages to ensure hydration.
The information in this program will be used for training supervisors and employees. L & I regulations require that affected employees receive annual training and it must be completed by May 1st. Affected employees hired between May 1 and Sept. 30 must receive training prior to any work assignments. Your supervisor will monitor on-site temperature and clothing requirements to determine if Table 1 applies. The following might be used for temperature readings: thermometer, psychrometer, or hygrometer.
| Table 1: Outdoor Temperature Action Levels | |
|---|---|
| All other clothing | 89 degrees |
| Double-layer woven clothes including coveralls, jackets and sweatshirts | 77 degrees |
| Non-breathing clothes including vapor barriers clothing or PPE such as chemical resistant suits | 52 degrees |
We will adhere to requirements for first aid supplies, first aid training and heat related illness training, Logging operations will have a written emergency medical plan per WAC 296-54 –513- 9 to ensure prompt medical attention, and a stretcher to carry an ill worker to a place accessible to EMS. All work sites will have reliable communication, such as a cell phone, so EMS services (911) can be reached.
We will ensure that a sufficient quantity of drinking water is readily accessible (as much as 2 gallons per person when exposed to temperature at or exceeding the temperature in Table 1) to employees at all times; and that all employees have the opportunity to drink at least one quart of drinking water per hour. If necessary, we will make arrangements to replenish water supply during the day. Your supervisor may send someone to purchase/obtain more drinking water. Your supervisor will tell you where the water is located.
Staying hydrated is extremely important. The body naturally sweats to cool itself. Sweating can use up a significant amount of fluid, which must be replaced continuously throughout the workday. If fluid is not regularly replaced, a worker will become dehydrated, increasing the risk for heat illness.
It is very important that you protect yourself and other workers by learning the signs and symptoms of heat illness and how to treat it.
How do you protect yourself from heat illness?
The three major forms of heat stress are heat cramps, heat exhaustion and heat stroke. Heat exhaustion is a serious problem, and heat stroke can kill you.
| Heat-related illness | Signs and Symptoms | First Aid |
|---|---|---|
| Heat Cramps | - Muscle cramps or spasms - Grasping the affected area - Abnormal body posture |
- Drink water or sports drinks - Rest, cool down - Massage affected muscle - Get medical evaluation if cramps persist |
| Heat Exhaustion | - Heavy sweating - Pale, cool skin - Headache - Weakness - Dizziness |
- Move to shade or air conditioned vehicle and loosen clothing; do not leave him or her alone - Spray water or apply cool, wet cloths to head and torso - Lay on back and elevate legs - Encourage person to drink cool liquids, preferably a sports drink - If no improvement, call 911 |
| Heat Stroke | - Any of the above but more severe - Hot, dry skin (25-50% of cases - Altered mental status with confusion or agitation - Can progress to loss of consciousness and seizures. - Can be fatal |
- Call 911 - Move the victim to a cool shaded area; do not leave him or her alone - If a shaded area is not available; the blanket with our first aid supplies can be used to block the sunlight. - Cool the person rapidly using whatever means you can. Fan the person, spray with cool water, or wipe with a wet cloth or cover with a wet sheet, immerse in a tub of cool water. - Apply icepacks to the person's neck, armpits and in the groin. - If responsive, lay on back. If unresponsive, place in recovery position (on side). - If responsive and not nauseous, give sips of water - Monitor airway and breathing - administer CPR if needed |
Safety Meeting/Training Date: ____________
Employees trained: _________
WAC 296-54-51530
WAC 296-54-513 (9) Each worksite must have an emergency medical plan to ensure rapid emergency care for employees with major illnesses and injuries
Employer ________
Office ____________
Phone Number ____________
Job Site Cell Phone Number(s) ______________
Is there cell phone service at the job site: Yes __ No__
If no, provide directions to the nearest location for cell service: _______________
Job Site Location
____________________________
Latitude Longitude Township Range
____________________________
Section 1/4 Section
Directions to site _______________
Property ownership _____________
County _______________
Emergency Medical Services
Ambulance Phone Number: 911 or
Helicopter Phone Number: 911 or
Working behind locked gate(s)? No __ Yes __
If yes, describe procedure for emergency vehicle
access _____________
A safety meeting must be held each time you move to a new jobsite and monthly after the initial jobsite meeting.
Company ________________
Date ___________
Location/Jobsite ________________
Is this the first safety meeting at a new jobsite? Yes __ No __
If yes, list and discuss any site-specific hazards (i.e. danger trees, steep slopes, small landing(s), poor deflection, etc.) _________________
Topic(s) Discussed ______________
Employees Present _______________
Meeting Conducted By ____________
Topics for Discussion
Slips and falls
Working on steep slopes
Proper distance between work areas
Proper communication
Emergency Medical Plan
First aid techniques and equipment
Accidents and near-misses
Personal protective equipment
Unsafe conditions or unsafe acts
Seat belts
Snags/Danger trees
Proper lifting and pulling technique
Driving safety
Proper undercut, backcut and hinge
Saw and chain maintenance
Domino falling
Bucking hazards
Hung-up trees
Barricades/Flaggers
Escape path
Kickback
| Name of the person conducting the inspection: | |||
| Jobsite Location: | Date: | ||
| Cutter name(s): 1. ____________________ |
2. | ||
| 3. ____________________ | 4. | ||
| Inspection (✓) | Yes | No | Comments (If no, list cutter's number and corrective action required) |
|---|---|---|---|
| Jobsite first aid supplies (first aid kit, stretcher, blanket, splint) | |||
| Written jobsite Emergency Medical Plan | |||
| Start-up and monthly safety meetings documented | |||
| Valid first aid card | |||
| Hard hat (hi-vis & no damage) | |||
| Caulk boots (sharp caulks, provides ankle support and in good condition) | |||
| Eye protection (screen, safety glasses or goggles) | |||
| Hearing protection (muffs or earplugs) | |||
| Gloves | |||
| Whistle (carried on the person and works) | |||
| Two-way radio (carried on the person and works) | |||
Man check. Visual or audible/radio contact at least every 30 minutes |
|||
| Must be at least 3 cutters working at the site to facilitate emergency response (less than 3 would be acceptable if arrangements have been made with another onsite company and radio communication is monitored constantly or each cutter carries a cell phone and they have the capability to call for assistance without leaving the injured or ill cutter) | |||
| Cutter’s first aid supplies in near proximity (2 trauma bandages or equivalent) | |||
| Leg protection (covers to the top of the boot & no damage to the cut protection material | |||
| Road blocked or flagger(s) used if tree(s) can reach the road | |||
| Wedges in near proximity (minimum of 2 wedges & in good condition) | |||
| Axe in near proximity (sharp, handle tight and in good condition) | |||
| Saw gas in approved container | |||
| Saw chain brake and trigger lock working properly | |||
| Saw chain is sharp and properly tensioned | |||
| Saw is in good condition | |||
| During operation, saw is gripped with the cutter's thumb under the handlebar | |||
| At least 2 tree lengths between work areas | |||
| Area around the tree is assessed for hazards (danger trees, widowmakers, loose objects) | |||
| Work area around the tree is brushed out | |||
| Escape path is established that will allow the cutter to move at least 10 feet from the stump | |||
| Tree is assessed for lean, overhead hazards & defects | |||
| Proper undercut is completed (cuts meet/no kerf dutchman, horizontal cut is level, depth of ¼ to about 1/3 the tree diameter, cleaned out, face opening at least 1/5 the tree diameter) | |||
| Undercut is used on trees over 6 inches DBH | |||
| Backcut is placed above the horizontal face cut | |||
| Hinge. Corners are maintained, adequate width across the stump | |||
| Escape path is used once the tree is committed to fall. Cutter should move at least 10 feet from the stump and look up and watch for falling limbs, tops, etc. | |||
| Domino falling is avoided (setting up multiple trees) | |||
| Demonstrates directional control (uses proper wedging technique & hinge width) | |||
| Avoids unnecessary brushing of timber | |||
| Follows proper procedures for pushing a tree that is limb tied or to overcome another falling difficulty (brush out around both trees, establish an escape path from the pusher tree, cut-up the first tree and drive in a wedge(s), while cutting the “pusher tree”, don’t turn your back on the cut-up tree) | |||
| Danger trees felled progressively with standing timber | |||
| Danger trees felled in the direction of lean and into open areas whenever possible | |||
| Lay of the tree is sized up before limbing/bucking (looks for bind, pivot points and potential log movement) | |||
| Establishes an escape path before starting a bucking cut | |||
| Limbs cut flush to log | |||
Additional comments:
Signature of person completing the inspection: ____________
Employee name _____________________
Date and time of incident ______________
Task being performed at time of incident
__________________________________
Incident reported to __________________
Date & time incident reported __________
Describe what part of the body was injured and injuries in detail
__________________________________
Name(s) of witness(es) _______________
__________________________________
Describe, step by step the events that led up to the incident and how the incident occurred:
__________________________________
Could anything be done to prevent accidents of this type? If so, what?
__________________________________
_____________________________
Signature of employee
Date: _____________
Instructions: Complete this form as soon as possible after an incident that results in serious injury or illness.
(Optional: Use to investigate a minor injury or near miss that could have resulted in a serious injury or illness.)
This is a report of a:
Date of incident: ______________
This report is made by:
| Step 1: Injured employee (complete this part for each injured employee) | ||
|---|---|---|
| Name: | Age: | |
| Job title at time of incident: | Months with this employer: ______ |
Months doing this job: ______ |
Nature of injury: (most serious one)
|
||
| Step 2: Describe the incident | |
|---|---|
| Exact location of the incident: | Exact time: |
| Names of witnesses (if any): | |
| What personal protective equipment was being used (if any)? | |
| Describe, step-by-step the events that led up to the injury. Include names of any machines, parts, objects, tools, materials, and other important details. | |
| Description continued on attached sheets: __ | |
| Step 3: Why did the incident happen? | |
|---|---|
Unsafe workplace conditions: (Check all that apply)
|
Unsafe acts by people: (Check all that apply)
|
| Why did the unsafe conditions exist? | |
| Why did the unsafe acts occur? | |
| Were the unsafe acts or conditions reported prior to the incident? | Yes __ No __ |
| Have there been similar incidents or near misses prior to this one | Yes __ No __ |
| Step 4: How can future incidents be prevented? |
|---|
| What changes do you suggest to prevent this incident/near miss from happening again? |
| __Stop this activity __Guard the hazard __Train the employee(s) __Train the supervisor(s) __Redesign task steps __Write a new policy/rule __Enforce existing policy __Routinely inspect for the hazard __Personal Protective Equipment __Other: ___________________ |
| What should be (or has been) done to carry out the suggestion(s) checked above? ______________________________ Description continued on attached sheets: __ |
| Step 5: Who completed and reviewed this form? (Please Print) | |
|---|---|
| Written by: | Title: __________________ Date: _________ |
| Names of investigation team members: | |
| Reviewed by: | Title: __________________ Date: _________ |
This form to be used by:
Cutter’s name:
Date:
Cutter’s address & phone number:
Trainer/Auditor name (circle the one that applies)
Trainer/Auditor phone number:
Note: In each of the sub-sections below, there is a space for “Comments”. Use the “comments” space to list your reasons for marking “unacceptable” or to provide positive feedback if the cutter “meets acceptable standards.”
| 1. First Aid & Emergency Procedures and Equipment | |
|---|---|
| First aid training | __ Meets acceptable standards
__ Unacceptable __Comments: |
| First aid supplies | __ Meets acceptable standards
__ Unacceptable __ Comments_ |
| Personal first aid kit (bleeder kit) |
__ Meets acceptable standards
__ Unacceptable __ Comments: |
| Whistle for signaling an emergency | __ Meets acceptable standards
__ Unacceptable __ Comments: |
| Man check and responding to an emergency | __ Meets acceptable standards
__ Unacceptable __ Comments: |
| Two-way radios | __ Meets acceptable standards
__ Unacceptable __ Comments: |
Cutter requirements for first aid, emergency procedures and equipment __ Pass __ Pass with the following recommendations for improvement: __ Fail for the following reasons: |
|
| 2. Personal Protective Equipment Hardhat | |
|---|---|
| Hardhat | __ Meets acceptable standards
__ Unacceptable __Comments: |
| Eye/Face protection | __ Meets acceptable standards
__ Unacceptable __ Comments_ |
| Hearing protection | __ Meets acceptable standards
__ Unacceptable __ Comments: |
Leg protection “Chaps” or inserts worn underneath the pants are acceptable |
__ Meets acceptable standards
__ Unacceptable __ Comments: |
| Foot protection | __ Meets acceptable standards
__ Unacceptable __ Comments: |
Cutter requirements for personal protective equipment __ Pass __ Pass with the following recommendations for improvement: __ Fail for the following reasons: |
|
3. Evaluation of cutting practices from the previous day When available and safe, look at 10 stumps. 8 of 10 stumps (or 80% of the stumps looked at) must meet acceptable standards to pass this section of the audit. |
|
|---|---|
| Work area | __ Meets acceptable standards
__ Unacceptable __Comments: |
| Undercuts | __ Meets acceptable standards
__ Unacceptable __ Comments_ |
| Backcuts | __ Meets acceptable standards
__ Unacceptable __ Comments: |
Evaluation of cutting practices from the previous day __ Pass __ Pass with the following recommendations for improvement: __ Fail for the following reasons: |
|
| 4. Chain saw and hand tools Chain saw | |
|---|---|
| Chain saw | __ Meets acceptable standards
__ Unacceptable __Comments: |
| Chain saw filing and chain tension | __ Meets acceptable standards
__ Unacceptable __ Comments_ |
| Axe or suitable tool for driving wedges | __ Meets acceptable standards
__ Unacceptable __ Comments: |
Wedges |
__ Meets acceptable standards
__ Unacceptable __ Comments: |
Chain saw and hand tools __ Pass __ Pass with the following recommendations for improvement: __ Fail for the following reasons: |
|
| 5. Chainsaw operation | |
|---|---|
| Starting the saw | __ Meets acceptable standards
__ Unacceptable __Comments: |
| Grip | __ Meets acceptable standards
__ Unacceptable __ Comments_ |
| Firm footing & balance | __ Meets acceptable standards
__ Unacceptable __ Comments: |
Carrying the saw |
__ Meets acceptable standards
__ Unacceptable __ Comments: |
| Chainsaw operation
__ Pass __ Pass with the following recommendations for improvement: __ Fail for the following reasons: |
|
| 6. Arrangement of work area and planning | |
|---|---|
| Distance between work areas | __ Meets acceptable standards
__ Unacceptable __Comments: |
| Work location | __ Meets acceptable standards
__ Unacceptable __ Comments_ |
| Traffic control on roads | __ Meets acceptable standards
__ Unacceptable __ Comments: |
| Arrangement of work area and planning
__ Pass __ Pass with the following recommendations for improvement: __ Fail for the following reasons: |
|
| 7. Falling the tree - preparation (must observe 10 trees) | |
|---|---|
Prepare to Fall the Tree Acceptable procedure:
__ Tree lean assessed from high side __ Escape path brushed out to allow cutter to move at least 10 feet away from the stump __ Windfalls, logs or other debris that could be thrown by the falling tree is cut away __ Danger trees/Snags felled progressively with other trees and as soon as an opening is available. __ Work area around the base of the tree is brushed out. __ Tree felled to the open whenever conditions permit (avoids brushing standing timber). __ Axe and wedges are in near proximity. __ Saw has an adequate amount of gas. |
__ Meets acceptable standards __ Unacceptable __Comments: |
| Falling the tree- preparation
__ Pass __ Pass with the following recommendations for improvement: __ Fail for the following reasons: |
|
| 8. Falling the tree (must observe 10 trees) | |
|---|---|
Falling procedure Acceptable procedure:
__ Good tree assessment from high side __ When felling a short stubby tree __ Avoids domino falling |
__ Meets acceptable standards __ Unacceptable __Comments:
|
Falling the tree __ Pass __ Pass with the following recommendations for improvement: __ Fail for the following reasons: |
|
| 9. Bucking (must observe at least 10 bucking cuts) | |
|---|---|
| Bucking | |
| Safe work procedures | |
Note: If trees aren't being bucked, ask cutter to identify safe work practices. Cutter must identify at least six (6) of the following SWPs to meet acceptable standards.
__ Rechecks canopy __ Assess tree stability before stepping onto the tree __ Checks for obstacles that could cause the tree to pivot, roll or move __ Determines high side and direction of gravity pull __ Identify the binds __ Bucked log lengths at or near the pivot points __ Determine and brushed out a safe bucking position on the high side __ Ensured stable footing __ Logs must be completely bucked through whenever possible. If it becomes hazardous to complete a cut, then the log must be marked and identified by a predetermined method. __ Escape path established and used. Cutter should never have his back up against a solid object, such as a root wad, large blowdown, or rock bluff, that would block his escape path. |
__ Meets acceptable standards
__ Unacceptable __Comments: |
Bucking __ Pass __ Pass with the following recommendations for improvement: __ Fail for the following reasons: |
|
| 10. Heavy Leaner - falling | |
|---|---|
| Questions if situation not available
Ask: What are the hazards?
Ask: What falling cuts would you use to prevent the hazards?
|
__ Meets acceptable standards
__ Meets acceptable standards
__ Unacceptable __Comments: |
Heavy leaner - falling __ Pass __ Pass with the following recommendations for improvement: __ Fail for the following reasons: |
|
| Overall audit result |
|---|
__ Pass __ Pass with with a required corrective action plan for improvement. (See attached corrective action plan) __ Fail (See attached explanation for failing the audit and corrective actions that need to be taken to pass.) |
Signature of trainer or auditor:
_______________________
Signature of trainee/cutter:
_______________________
Daily Training Log for New Cutter Training
Cutter’s name:
Trainer’s name(s):
| Day | Date of basic training | Curriculum topic(s) that were covered (enter topic numbers) |
Comments on performance of the new cutter |
Cutter's signature | Trainer's signature |
|---|---|---|---|---|---|
| 1 | Topics 1 & 2 must be covered on day 1 | ||||
| 2 | |||||
| 3 | |||||
| 4 | |||||
| 5 | |||||
| 6 | |||||
|
|
|
|||
Weekly Evaluation Training Log for New Cutter Training
Cutter's name: _____________________________________
Trainer's name(s): __________________________________
| Week | Date of evaluation |
Curriculum topic(s) that were reinforced (enter topic numbers) |
Comments on cutters |
Cutter's signature |
Trainer's signature |
|---|---|---|---|---|---|
| 1 | __ Meeting requirements __ Not meeting requirements |
||||
| 2 | __ Meeting requirements __ Not meeting requirements |
||||
| 3 | __ Meeting requirements __ Not meeting requirements |
||||
| 4 | __ Meeting requirements __ Not meeting requirements |
||||
| 5 | __ Meeting requirements __ Not meeting requirements |
||||
| 6 | __ Meeting requirements __ Not meeting requirements |
||||
|
|
|
|||
| Week | Action plan for improvement | Cutter's initials | Trainer's initials |
|---|---|---|---|
| 1 | |||
| 2 | |||
| 3 | |||
| 4 | |||
| 5 |
Publication #: 7/2014
Disclaimer and Reproduction Information: Information in NASD does not represent NIOSH policy. Information included in NASD appears by permission of the author and/or copyright holder. More