Instructor's Guide and Activity Materials Table of Contents
Instructions
for Gathering and Preparing the Materials
All the
materials needed for this activity are inexpensive, readily
available, easily assembled, and once prepared can be used
repeatedly with little effort and preparation time. However,
about three or four hours are needed to gather and assemble
the materials the first time. These instructions are broken
into three parts. These include (a) obtaining and preparing
the model tractor(s) with and without a ROPS, (b) constructing
the cardboard(or 1/4 inch plywood if one wishes) bridge and
ramp needed for the demonstration, and (c)gathering the other
materials needed to complete the activity. Follow these steps
to gather and assemble the materials needed for the activity.
Note that the construction, preparation,and use of these materials
is a good project for vocational agriculture students.
Preparing the Model Tractor(s)
Either one or two model tractors can be used for the activity. If one model tractor issued it must come without a ROPS and a model ROPS for the tractor must be constructed to retrofit the model tractor. If two model tractors are used, one must come without a ROPS and the other already fitted with a ROPS. Directions for both alternatives are provided.
1. Obtain a 1/16th scale model farm tractor without a ROPS. These are available from tractor equipment dealers and farm supply stores for about $30. (Many farm safety instructors already have model tractors.) Make sure the real tractor that the model represents has a ROPS retrofit package available. (You don't want to convey false information to the participants.) Also make sure the scale model tractor you purchase has sufficient space on the rear axle between the tractor fenders and the tractor body to fit a small clamp (see Figure 1). Check to make sure that the seat is back far enough from the steering wheel that a medium size hen's egg can be placed in the seat (see Figure 2).
A 1/16th scale model of an International Fat-mall 856 works well because (a) there is1/ 2 inch of space on the rear axle housing between the tractor fender and the tractor body, (b) the seat is large enough and back far enough from the steering wheel to accommodate even a large hen's egg, (c) the seat is large enough to attach two Velcro sticky back squares, one on the seat bottom and the other on the upright seat back, and(d) a retrofit ROPS package is available for actual Farmal 856 tractors. The instructions and drawings that follow explain how to construct a ROPS for this 1/16th inch scale tractor. If you use another tractor scale model, you will need to adjust the specifications given in Figures 1 - 9.
NOTE: An easier alternative is to obtain two similar size 1/16th scale model tractors,one that comes equipped with a ROPS and one that does not. Both tractors must have a seat and operator's compartment large enough to seat a medium sized hen's egg. In this case two tractors are used to conduct the demonstration, one without a ROPS for the first demonstration, the second tractor with the ROPS and the unbelted Mr. Good Egg farmer for the second demonstrations, and the same ROPS-equipped model tractor with the belted egg operator for the third demonstration. If you choose this alternative, skip instructions 2 through 6 and go to the Constructing the Cardboard Bridge section (item 8).
2. If you decide to use one model tractor and a retrofit model ROPS, attach two 1/2 inch diameter vinyl coated steel wire harness clamps to the model tractor rear axle, placing each clamp between the fender and the tractor body as shown in Figure 3. These clamps can be purchased in nearly any automotive, hardware, or electrical supply store.
3. Obtain a 1/4 inch diameter steel rod 14.5 inches long. Using a tap and die set, thread one inch of both ends of the rod. Use a 1/4 inch x 20 threads per inch die (see Figure 4).
4. Make two marks on the same side of the steel rod 5 1/2 inches from each end. Place one end of the steel rod upright in a vice. Heat the rod with a torch at the 5 1/2 inchmark and bend the rod inward to achieve a 90 degree angle. Repeat the procedure for the other end of the rod. Bend the rod to the dimensions listed in Figure 5. Be careful to make the bends 90 degrees each and in the same plane to keep the upright portions of the two sides parallel in both planes. If it is bent properly, when it is laid down the U-shaped rod should lie flat on the workbench or table top. If you don't have a torch to heat the rod, notch the inside bend of the rod with a triangular file at the two marks 5 1/2 inches from each end of the rod. Then bend each 6 inch end of the rod to a 90 degree angle using a vice to hold the 6 inch upright portion close to the notch. Then bend and tap the rod with a ball peen hammer until a fairly tight rounded bend brings the top portion of the ROPS to a 90 degree angle with the 6 inch upright side. Repeat the process for the other side. Again, be careful to keep the upright portions of the two sides of the bent rod parallel in both planes.
5. Place one 1/4 inch nut on each end of the model ROPS you have just constructed. Screw each nut all the way up to the end of the threads on each side of the rod and tighten finger tight. (These two nuts act as spacers that keep the rod from falling through the holes in the clamp.) see Figure 6.
6. Place the ends of the model ROPS through the holes in the clamps (see Figure 7). Add a second 1/4 inch nut to each side of the model ROPS (see Figure 8.) Then tighten the nuts slightly and adjust the angle of the ROPS to the proper position by tilting it back or forward as needed (see Figure 8). Then tighten the second nuts sufficiently to hold the clamps on the axle in place. Finger tight is usually sufficient to hold the model ROPS firmly in place, especially if vinyl coated clamps are used. Otherwise a small socket wrench with a screwdriver handle works well.
7. Remove the model ROPS. Paint the unthreaded portion with a flat black paint. Don't paint the threaded ends (see Figure 5). Allow the paint to dry and then reinstall the ROPS on the model tractor.
Constructing the Cardboard Bridge
8. Constructing the cardboard bridge is the next step. First, find a large heavy corrugated cardboard box. Look at Figures 10 - 13 and follow these instructions
10. Place the cardboard bridge and ramp on top of the 2 x 4 supports as shown in Figure12. You are almost ready to do the demonstration.
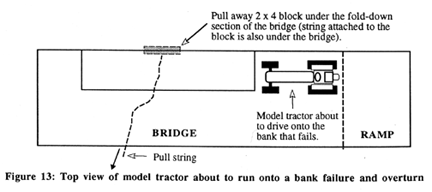
11. Place the 5 inch section of 2 x 4 with the string attached to it under the 16 inch hinged section of the bridge as shown in Figure 13. This section of the bridge simulates an embankment failure when the block is pulled out from under the cardboard flap.
12. Before you conduct the activity, test your apparatus. Set a model tractor on the bridge as shown in Figure 13. Then roll the tractor slowly onto the cardboard flap. When the rear wheel of the tractor is 2 inches out on the flap, pull the 5 inch supporting blockout and away from the bridge. The tractor should overturn sideways with enough force to crush a Mr. Good Egg farmer who is not protected by a ROPS and seat belt.
Gathering the Other Materials The other materials needed for the activity are available from many places and very easy to assemble.
13. Purchase a package or two of Velcro Sticky Back Squares, hook and loop fasteners. These are two-part 7/8 inch squares used to hold picture frames or other objects against a wall or some other surface. These fasteners can be purchased at a supermarket, hardware store, or in the home or hardware section of a general merchandise store. The Velcro sticky fasteners are used to hold the "belted" Mr. Good Egg farmer to the ROPS-equipped model tractor seat.
14. It's a good idea to have a roll of Scotch or masking tape. A strip of tape can be placed on the underside of the bridge to reinforce the hinge on the cardboard flap. Another piece of tape can be used to tape the lower end of the ramp to the table top or to the floor.
15. Obtain five or six different color felt pens. The pens are used to draw faces on the Mr.Good Egg farmers. These can be purchased in any drug store, supermarket, or general merchandise store.
16. Purchase a dozen raw, medium size hen's eggs from a grocery store or supermarket.
17. Obtain a 4 x 6 foot or larger sheet of clear plastic. The plastic sheet is taped to a large table top or to the floor to protect the surface from broken egg white and yolk. Clear plastic sheets are available from scrap wrapping, from hardware stores, farm or construction supply stores.
18. Have a roll of paper towels, a sponge, a bucket of water, and a spray bottle of countertop cleaner handy. These are used to clean up egg white and yolk form crushed Mr. Good Egg farmers who had the misfortune of overturning a model tractor that was not fitted with a ROPS, and/or who were on a ROPS-equipped tractor but who were not wearing a seat belt during the overturn.
Diagrams For Constructing the ROPS and Bridge
The six pages of figures that follow illustrate how to select a model tractor for the Mr.Good Egg activity, and how to fit this tractor with a model ROPS. Other diagrams also illustrate how to construct the cardboard bridge with it ramp and break-away embankment.
Figure
1
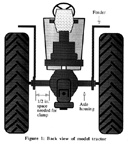
Figure 2
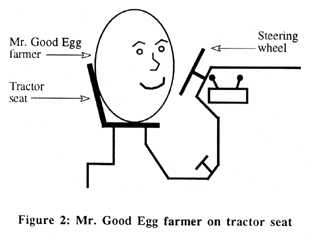
Figure 3
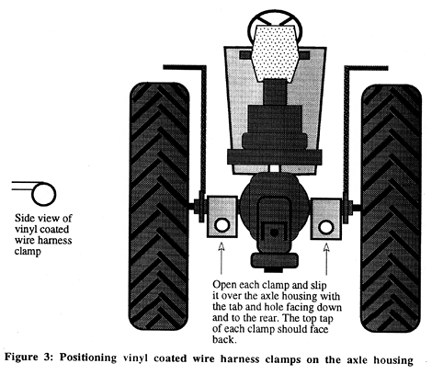
Figure 4
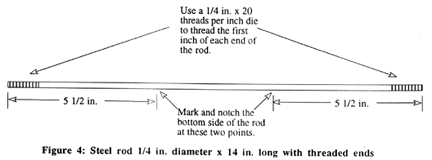
Figure 5
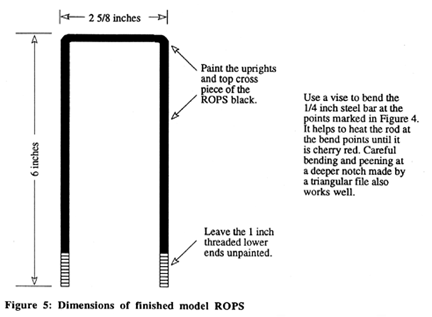
Figure 6
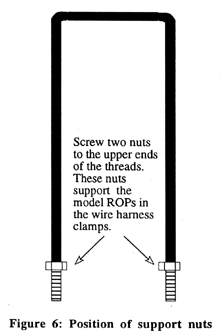
Figure 7
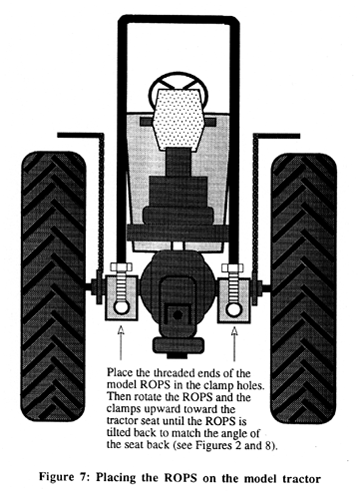
Figure 8
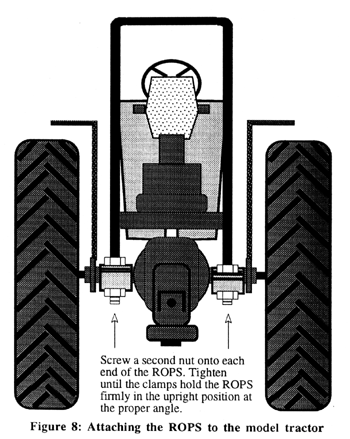
Figure 10
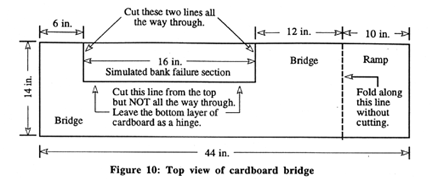
Figure 11

Figure 12

Figure 13
Disclaimer and Reproduction Information: Information in
NASD does not represent NIOSH policy. Information included in
NASD appears by permission of the author and/or copyright holder.
More