WOSHTEP Dairy Safety Training Guide


Welcome to the Dairy Safety Training Program

Introduction

The dairy industry has dramatically changed in recent years. New processing technologies, shifts in consumers’ preferences, and changes in economic conditions have changed the way dairies operate. It is undeniable that the forces of the economy have pushed increased efficiency in animal production. In their efforts to lower per-unit production costs, small-scale operations are becoming fewer in number, and more cost-effective large-scale operations are increasing so that there are fewer, but larger, dairies.

At the same time that the concentration of animals is increasing, there has been a decrease in the number of workers employed. Increasing the number of animals per worker may increase workers’ risk of injury and illness. Injuries and illnesses on the job are costly and damaging – both for the individual employee who gets hurt and for your dairy.

Recent research studies show that the two main causes of workers’ injuries (fatal and non-fatal) are incidents with machinery and animals (Mitloehner and Calvo 2008). Machine-related accidents include tractor rollovers, being run over by tractors and being entangled in rotating shafts. Animal-related injuries include kicks, and workers being pinned between animals and fixed objects. Other causes of injuries include chemical hazards, confined spaces, manure lagoons, use of power tools, and improper use or lack of personal protective equipment.

It is the responsibility of the employer to provide a safe workplace to all employees, by setting up the worksite as safely as possible. Employees also have a responsibility to follow safety rules. Employers should have safe, wellmaintained equipment; enforce safe work practices; provide protective gear when necessary; and train employees about the hazards they face and how to work safely. At the end of this guide, you will find useful background information on how to take the safest approach, and what components your health and safety program should have.

This Dairy Safety Training Program will help strengthen your health and safety program by helping you teach your employees about hazards they face to reduce the chance of injury.

It is not enough to just tell employees to “be more careful” to avoid injury or illness. To stay safe on the job, staff (especially new employees and younger employees) need:

  • A safe workplace,
  • Training,
  • Mentoring, and
  • Practice.

Why Use this Program?

The Dairy Safety Training Program is designed specifically for dairy owners and managers who need to train employees working in dairies. This training program can help:

  • Prevent job injuries and illnesses. Regular training helps employees learn how to avoid hazards, keeps lines of communication open between you and your employees, and lets employees know that you are serious about promoting safe work practices.
  • Lower workers’ compensation costs. Medical costs in the workers’ compensation system have begun to increase in recent years.

    The cost of workers’ compensation for the dairy industry is about three times the average cost of workers’ compensation in California, according to the Workers’ Compensation Insurance Rating Bureau.

  • Reduce the number of days away from work and lost productivity. The best way to reduce costs, retain jobs and maintain a productive workforce is to reduce injuries.

  • Meet training requirements under California’s occupational health and safety laws.

Materials Included

This training guide is designed to be used by owners and managers. It contains step-by-step instructions for conducting the training sessions and background information and resources for owners and managers. In addition to the materials provided in this guide, the California Worker Occupational Safety and Health Training and Education Program (WOSHTEP) also has available Heat Hazards in Agriculture: A Guide for Employees to Carry Out Tailgate Training. This free guide can be obtained from the WOSHTEP Resource Centers. See the resources section of this guide for information.

The training methods used in this guide are participatory. Research shows that when people are actively engaged in their own learning by discussing, problem-solving, and practicing new skills through hands-on activities, they are more motivated to participate and committed to supporting best practices.

The Dairy Safety Training Program materials are available in English and Spanish.

A good health and safety program is built on management commitment and employees’ involvement.
Regular health and safety training for employees is one of the best strategies to prevent job injuries and illnesses.

Conducting the Training

What is in the Training Session

The five training sessions (approximately 30-minutes each) address some of the most common hazards in the dairy industry. The topics are listed below:

  • Identifying Hazards
  • Controlling Hazards
  • Machinery Safety
  • Animal Safety
  • Planning for Emergencies

For each of the sessions you will find:

  • Session objectives – what the participants will learn from that session.
  • Materials needed – a list of what you will need to conduct the session, including handouts and presenter materials.
  • Prior to the session – a list of suggestions for the person conducting the training on how to prepare for the training, including information on the materials to be reviewed and training tips.
  • Conducting the session – a list of step-by-step instructions for teaching the session, including suggestions for what to say, what materials to use, and suggested times for each section.

Remember to document all trainings by recording the date, topic, name of the trainer, and names of the employees. If you have fewer than 10 employees, just keep a log of the instructions provided to each employee.

When to Conduct the Trainings

It is best to conduct the training program when employees are first hired. Failing to train workers before they are exposed to hazards in the workplace might result not only in a violation of Cal/ OSHA’s rules, but also in a serious or fatal accident. For existing employees, you may wish to hold the short training sessions spread out over several weeks. This gives employees an opportunity to absorb the information. If this is not possible, you can hold a single training session covering all the topics at once.

How to Maximize Employee Participation

It is best to conduct the training sessions in groups (2 to 25 employees) to foster discussion and exchange ideas. Whether your training sessions are held in a group or one-on-one, encourage employees to speak up about their concerns. Involving your employees in identifying potential problems is an effective way to get employee buy-in regarding the importance of health and safety. Also, encourage employees to offer suggestions to improve health and safety. Since they are doing the work day-to-day, they know what works and what does not. They may also have ideas that can be shared with other employees.

Session # 1 – Identifying Hazards (Approximate time 30 minutes)

Session Objectives

At the end of this session, participants will be able to:

  1. Identify a range of health and safety hazards that may be found in their workplace, including animal and machinery hazards, chemical hazards and other physical hazards such as heat.
  2. Recognize that the main causes of injury in dairies are related to machinery and animal hazards.

Materials Needed:

  1. Flip chart paper, markers and tape (if possible)
  2. Calendar with the dates and times of the training posted

Prior to the Session

  1. Familiarize yourself with the training materials.
  2. Gather the materials you will need to conduct the session.
  3. Get the training area ready for the session. Try to select a quiet area where workers feel comfortable and can concentrate on what is being discussed.

Conducting the Session

  1. Introduction – 5 minutes
    • Explain to participants that this is the first session of five brief sessions to discuss health and safety issues in dairies.
    • Explain the importance of their participation during the sessions, so that everyone learns from each other’s experiences and knowledge.
    • Tell participants the schedule for all five sessions. You also may mark on a calendar the days and times in which you will conduct each of the sessions. Post the calendar on a wall in a place easily accessible to everyone.

  2. Defining the Word Hazard – 5 minutes
    • Ask what the word “hazard” means to participants. You may want to write their responses on a flip chart (or any large piece of paper you tape to the wall).
    • Explain: A job hazard is anything at work with the potential to harm you, either physically or mentally.

  3. Hazard Listing – 15 minutes
    • Ask participants to think about all the potential hazards that may exist in this facility.
    • Ask participants to call out their ideas. Write their answers on the flip chart paper (or any large piece of paper).
    • Review the list with participants.
    • Explain – The hazards we just listed can be grouped into three main categories:
      • Machinery Hazards
      • Animal Hazards
      • Other Hazards
    • Mention that research shows that most accidents in dairies are related to machinery and animals; thus, there will be special sessions to discuss each of them.

  4. Sum-up – 5 minutes
    • Ask participants to explain in their own words what a job hazard is and mention some examples.
    • Tell participants about the next session:
    • In our next session, we will talk about how we do things here at this worksite to reduce hazards and to keep you from getting injured. We want you, the employees, to always be thinking about how to make things safer. In dairy work, it is impossible to eliminate all hazards, but there is a lot that can be done to make things safer. Here is what we are looking for:

      1. Have we set up the job in the safest way possible? For example, is the equipment safe and in good repair? Do our tractors have ROPS (roll over protection structure)? We welcome any ideas you have along the way for setting up the workplace to be as safe as possible.
      2. Are you and your co-workers doing the work in the safest way possible? Do you have the training you need?
      3. Do you and your co-workers need any kind of protective gear to do this work, such as gloves or dust masks? If so, is it available when you need it? Is it the right kind? Does it fit? It is better if we can figure out a way to do the work that does not depend on protective gear, but that is not always possible.
    • In the next session, we will talk about some specific injuries and how they can be prevented.
    • Remind employees when the next session will be conducted.
Potential Hazards
Machinery Animal Other
  • Tractor rollover
  • Run over by tractor
  • Entangled in shaft
  • Hurt by high-pressure injector
  • Get caught in moving parts
  • Forklift rollover
  • Hurt while inflating/changing tractor tires
  • Hurt by hay bailer
  • Kicks
  • Bites
  • Being pinned
  • Being rammed
  • Stepped on
  • Pushed
  • Splash with chemicals
  • Stuck with needles
  • Falls (from trees, roofs, ladders, etc.)
  • Slips
  • Confined spaces
  • Extreme heat and/or cold
  • Drowning
  • Electrocution
  • Cuts
  • Crushed by hay, feed
  • Dust
  • Fumes/gases

Note to the Instructor:

There are many ways to find the hazards in a workplace. One useful tool is to create a hazard map. To create a hazard map, make a simple drawing of the dairy’s floor plan and have employees mark all the spots where there is a hazard or potential hazard. You can schedule a session to go over the list of hazards created by the group and then locate them in the map. For tips on how to create a hazard map, contact your WOSHTEP Resource Center. (See the resource section of this guide for contact information.)

Session #2 – Controlling Hazards (Approximate time 30 minutes)

If necessary, you can schedule two Controlling Hazards sessions.

Session Objectives

At the end of this session, participants will be able to:

  1. Identify underlying factors that contribute to workplace injuries and illnesses.
  2. Discuss strategies to reduce job hazards.

Materials Needed:

  1. List of potential hazards created during last session
  2. Case studies
  3. Flip chart and markers (if possible)

Prior to the Session

Select three to four case studies to review during the 30-minute session. There are seven case studies included in this session. The cases are based on real dairy accidents. Because we try to limit the duration of each session to around 30 minutes, we suggest you select three or four case studies to allow enough time for participants to discuss each case in detail. However, it may be a good idea to conduct two sessions focused on controlling hazards so participants have an opportunity to learn from all of the cases.

Conducting the Session

  1. Introduction – 5 minutes
    • Welcome participants.
    • Post the list of potential hazards that were created during the last session and briefly review what was covered.
    • Ask participants if they would like to add anything to the list.
    • Provide an overview of controlling hazards. Explain:
      • Workplace hazards can be reduced or eliminated by: (1) getting rid of the hazard; (2) instituting policies and procedures that reduce the hazard; and (3) using personal protective equipment.
      • Not all potential solutions to a hazard are equally effective. The most protective solutions are those that remove the hazard altogether.
      • Sometimes you may need a combination of methods to control a hazard.
      • Next, we are going to go over several stories about workers who were injured working in a dairy and talk about ways to control the hazard in order to prevent similar injuries.

  2. Case Studies – 20 minutes
    • Explain to the class that you will read aloud some stories of accidents that happened in dairies. Then, as a group, you will talk about what might have prevented the injury.
    • Tell participants that all the case studies are based on true stories.
    • Read the case studies one by one, giving participants’ time to present possible solutions. Write their answers on a flip chart – one page per case study.
    • Discuss the answers.
    Case 1 – Infected Finger

      It was late Friday afternoon when Isaac was finishing up feeding the calves and making sure the hutch doors were closed. He was working quickly because it was getting late. While closing one of the last doors, Isaac’s finger was cut on a door handle that had a sharp, rusty edge. Other workers had torn their clothes and scratched their arms on the door handle in the past, but this time, Isaac’s finger was cut badly. Because he was almost finished with the job, he just wrapped his finger with a napkin and continued working. He did not clean his finger until he got home, where he washed it well. The following Monday, Isaac could not move his finger and his whole hand was swollen. When he arrived at the dairy the next day, his supervisor sent him to the hospital. The doctor told Isaac that his finger was severely infected. He was admitted for an I-V antibiotic treatment every eight hours for three days.

    Ask participants – What might have prevented this injury?

    Let participants respond and then make sure all of the following points are covered.
    (You may write the group’s answers on the flip chart paper.)

    What might have prevented this injury?
    • Ask for help to finish sooner.
    • Perform the task at the regular pace.
    • Wash his finger immediately after the injury.
    • Stop working after he was hurt and go get treatment.
    • Do not wrap his finger with a napkin.
    • Go to the doctor immediately.
    • Note:

      • Because the employee was admitted to a hospital for more than just observation, the employer must report it to the nearest office of Cal/OSHA Enforcement. Failure to do so could result in a $5,000 penalty. See http:// www.dir.ca.gov/title8/ch3.2sb2a3.html.
      • The employer also has to record the incident. See http://www.dir.ca.gov/T8/ h&sb1a2.html and http://www.dir.ca.gov/T8/14300.29.html
    Case 2 – Serious Injury to the Abdomen

      Ramiro was inside the extended bucket of a John Deer front-end loader, approximately 10 feet above ground level, removing the twine holding down the protective tarp of a haystack. He was cutting one of the lines holding down the tarp when a bale above him began to fall from about 20 feet. The loader operator moved the tractor backwards as Ramiro turned his body away from the falling bale. The bale pinned Ramiro against the rear bar of the bucket causing serious injuries to his abdomen.

    Ask participants – What might have prevented this injury?

    Let participants respond and then make sure all of the following points are covered.
    (You may write the group’s answers on the flip chart paper.)

    What might have prevented this injury?
    • Do not work out of the bucket.
    • Avoid piling the hay too high.
    • Raise the extended bucket above 10 feet.
    • Avoid over-extending the bucket.
    • Try to do the task from a different angle to avoid falling haystacks.
    • Note:

      • For the safety order on working out of loader buckets, see: http://www.dir.ca.gov/Title8/1593.html
      • Loading buckets, scoops, blades or similar attachments on haulage vehicles that do not provide the fall protection equivalent to that required by Section 3210 of the General Industry Safety Orders or Article 24 of the Construction Safety Orders (starting with section 1669), shall not be used as work platforms or to elevate or transport employees.
    Case 3 – Fall From a Tree

      Peter had been trimming the trees around the property using a chainsaw since early in the morning. At around 1:30 p.m., Peter was working in one of the tallest trees, with one of his legs on a ladder step and the other on one of the branches. Suddenly, the branch snapped, twisting and pinning him against the tree. After two other employees rescued him, Peter was hospitalized for severe internal injuries.

    Ask participants – What might have prevented this injury?

    Let participants respond and then make sure all of the following points are covered. (You may write the group’s answers on the flip chart paper.)

    What might have prevented this injury?
    Case 4 – Hurt by a Bull

      Greg, a lifelong dairy farmer, was fixing an area of the fence that had been damaged by a storm. Helping him was Oscar, a young worker who was hired a few days earlier. Greg went to the truck to drink some water and left Oscar standing outside the fence removing some old nails from a post. Oscar was having trouble removing one of the nails, so he jumped over the fence to get a better grasp and pull out the nail. While Oscar’s back was turned away from the animals, a bull ran toward him, ramming Oscar against the fence. Oscar fell but managed to scramble back under the gate before the bull attacked him again. Oscar had several bruises and three broken ribs. He spent a week at the hospital and it took him six months to be able to go back to work.

    Ask participants – What might have prevented this injury?

    Let participants respond and then make sure all of the following points are covered.
    (You may write the group’s answers on the flip chart paper.)

    What might have prevented this injury?
    • Provide training on animal safety before workers begin working.
    • Do not leave a novice worker working alone, even if it is for a few minutes.
    • Move bulls into other pens before working inside a pen.
    • Keep a safe distance from bulls, watching them carefully when they are in open yards.
    • Learn how to identify the aggressive postures that bulls exhibit before they attack.
    • Install protective obstacles and “person-gates” that make it easy to escape a charging bull.
    • Plan escape routes from open cattle yards.
    • Cull aggressive bulls from the herd and, in general, do not keep bulls past two years old.
    Case 5 – Pinned Under a Tractor

      David was hauling manure from a pit to a small field not far from the farmhouse. He was shortstaffed but anxious to complete this task before the sun went down. He had worked since early morning and even skipped lunch to finish as soon as possible. During the hauling, David had to maneuver his tractor down a slight incline to get the manure spreader in the right position to load the manure from the barnyard. By mid-afternoon, David had taken approximately 25 loads to the field and was eager to finish clearing up the pit, so he speeded the tractor up a bit. David was returning back up the slight incline to position the manure spreader, when the tractor turned over, pinning him under the rear fender. Both his legs were broken and he could not work around the dairy for more than 8 weeks.

    Ask participants – What might have prevented this injury?

    Let participants respond and then make sure all of the following points are covered.
    (You may write the group’s answers on the flip chart paper.)

    What might have prevented this injury?
    Case 6 – Two Workers Die in Manure Pit
      Norman, a 35-year-old dairy worker, and his younger brother, Kenneth, were milking cows when they noticed the manure pit was overfilled. Norman turned on the waste pump to empty the pit in order to keep the manure from spilling over. They discovered that the suction line inside the pit was blocked and so decided to enter the pit to clear it. After putting on rubber chest waders, Norman entered the pit with a pipe wrench to unclog the blockage, while Kenneth stood on the edge of the pit providing assistance. However, before Norman could reach the blocked pipe, he collapsed. Kenneth entered the pit to help Norman, but collapsed on top of him. Four hours later, co-workers found the two brothers inside the pit, dead.
    Ask participants – What might have prevented this injury?

    Let participants respond and then make sure all of the following points are covered.
    (You may write the group’s answers on the flip chart paper.)

    What might have prevented this injury?
    • Post warning signs and confined space procedures where workers can see them.
    • Provide training to workers on the following:
      • Confined space procedures.
      • Use of protective clothing and respiratory protection.
      • Use of lifelines.
      • Use of emergency rescue equipment.
    • Have a confined space safe rescue plan.
    • Make sure there is a system in place for monitoring the air for safe entry before anyone enters a confined space.
    • Make sure that workers do not enter confined spaces without the appropriate personal protective equipment and training.
    • Note: Natural decomposition of waste materials causes a decrease in the oxygen levels at the same time it produces other (potentially deadly) gasses such as methane, ammonia and cyanide. Even a very brief entry can be fatal. Previous successful entries are NOT an indicator that it will be safe to enter the next time. Always monitor the air first and use appropriate personal protective equipment!

    Case 7 – Chemical Exposure

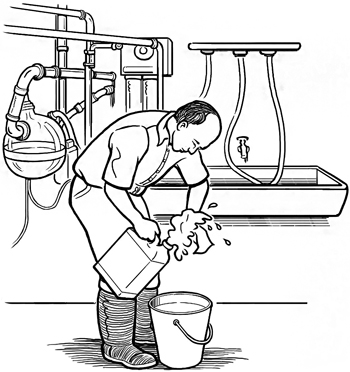
      John was cleaning the milking equipment before milking the cows. This was the first time he had performed this task; however, he had seen his co-worker do it every day for more than a month. John was refilling the cleaning solution when suddenly it splashed onto his chest and arm causing a burning sensation. He rushed to rinse it off with water but had to be taken to the hospital, where he received treatment.

    Ask participants – What might have prevented this injury?

    Let participants respond and then make sure all of the following points are covered.
    (You may write the group’s answers on the flip chart paper.)

    What might have prevented this injury?
    • Workers should be instructed to not engage in any work task for which they have not been trained.
    • Workers should be trained about any chemicals they work with, what their possible health effects are, and how they should protect themselves from these chemicals.
    • Workers should receive training on how to perform the task, including some practice.
    • A supervisor should be available to monitor the task until the employee masters it.
    • Workers should be trained on what to do in case of emergency.
    • Use proper tools (funnel).
    • Find a less hazardous cleaning chemical to use.
    • Workers should be provided (and use) personal protective equipment, such as goggles, apron, long sleeves, gloves, and boots.
    • Note: An eyewash and/or emergency shower should be available in the immediate work area if the chemicals used are corrosive.

    Tell participants – We are now going to talk a little more about chemicals. How can chemicals hurt you?
        Let participants respond and then make sure all of the following points are covered.
    How can chemicals hurt you?
    (You may write the group’s answers on the flip chart)
    • Different chemicals cause different kinds of health problems, such as dizziness and trouble breathing. Some can cause cancer or other serious problems. Some chemicals can also burn your skin or cause rashes. It is important to know what chemicals you work with and how they might be able to harm you.
    • Some chemicals cause symptoms right away, but sometimes health problems from chemicals show up much later on. If you use certain chemicals for a long time, there is more of a chance of health problems later.
    • Some chemicals can also burn your skin or cause rashes. Some can catch fire or cause an explosion under certain conditions.
    Ask participants – Does anyone know where to find out information about the chemicals in a product?

    Let participants respond and then make sure all of the following points are covered. (You may write the group’s answers on the flip chart paper.)

    Where can you find out information about the chemicals in a product?
    • Check the label on the product.
    • Ask your supervisor.
    • Look at the Material Safety Data Sheet (MSDS) for the product.
    • Note: Before using chemicals, learn all you can about them (how to use them properly, potential health hazards, and how to dispose of used containers). Companies that make chemical products must write up information sheets, called an MSDS (material safety data sheet). They send the information sheets to the companies and others that use their products. MSDSs tell you what is in the product, how it can harm you, and how to protect yourself, including what kind of gloves, goggles, or other protective gear to wear.

  3. Sum-up – 5 minutes
  • Ask the group to share what they think are the key points of this module. Answers may include:
    • Workplace hazards can be reduced or eliminated by: (1) getting rid of the hazard; (2) following safety policies and procedures; and (3) using personal protective equipment.
    • Not all potential solutions to a hazard are equally effective. The most effective is to remove the hazard altogether.
    • Sometimes you may need a combination of methods to control a hazard.
    • Employee involvement in finding solutions is important. Come up with as many ideas as possible for solutions before deciding what to do.
  • Remind employees when the next session will be conducted.

man with wash basin and oher hazards

Session #3 – Machinery Safety (Approximate time 30 minutes)

Session Objectives

At the end of this session, participants will be able to:

  • Identify basic safety practices when using different kinds of machinery in their workplace.

Materials Needed:

  1. Copies of the activity sheet “What is Wrong With This Picture?” (one per participant)
  2. Pens or pencils
  3. Flip chart and markers (if possible)

Prior to the Session

Familiarize yourself with the activity sheet and make enough copies. One copy per participant.

Conducting the Session

  1. Introduction – 5 minutes
    • Welcome participants.
    • Tell participants – Working in agriculture ranks among the most hazardous occupations in the United States. The main cause of worker injuries is machinery. Accidents with machines include tractor rollovers, being snagged or entangled in the power take-off, being run over, and electrocution. In this session, we will focus on various ways to reduce or eliminate hazards related to machinery.
  2. Exercise – 20 minutes
    • Distribute the copies of the activity sheet “What is Wrong With This Picture?”
    • Tell participants – Please look at the drawing carefully and mark what you think is wrong in the picture. Also think about what could be done to reduce or eliminate the hazards you find.
    • Give participants about five minutes to identify the hazards depicted. Then bring them together to discuss what they identified.
    • Use the Activity Sheet Discussion Points to help you address everything shown in the picture. To guide the discussion ask – What could happen? What could be done to reduce or eliminate that hazard? You may write their answers on the flip chart.
  3. Sum-up – 5 minutes
  • Ask the group to share what they think are the key points of this module. Answers may include:
    • Using the right equipment for each task reduces their chances of injury.
    • Checking equipment before using it is important to increase safety. (See Cal/OSHA T8/3650)
    • When using a tractor: one worker per seat only.
    • Equipment should be unplugged or turned off before working on it.
  • Remind them when the next session will be conducted.

Session # 3 Activity Sheet – What is Wrong With This Picture?

picture

Session # 3 Activity Sheet – Answers

answers

Session # 3 Activity Sheet – Discussion Points

Hazard What could happen? What could be done to reduce or eliminate the hazard?
There are two workers on top of the small tractor sharing the only available seat.
  • One of the workers could fall out of the tractor and get hurt in the fall.
  • The fallen worker could be run over by the tractor and killed.
  • Employer could get a serious citation with a penalty of $25,000 from Cal/ OSHA for allowing a rider without adequate riding facilities. T8CCR3650
  • One worker per seat only.
Worker is driving a forklift up a small hill with the fork up and loaded.
  • Forklift could tip over pinning worker under – he may be hurt or even killed.
  • Use another type of equipment, maybe a wagon or tractor.
Worker is clearing debris close to irrigation canal. Tractor clearing debris does not have ROPS (roll over protection system).
  • The tractor could tip over, pinning driver underneath.
  • Driver could lose control of tractor.
  • Employer could get a citation for failure to have ROPS under T8CCR3651. (Also see operating rules under T8/3664).
  • Install ROPS and seatbelts.
  • Leave more space between tractor and canal.
  • Do the work by hand with a crew
Worker changing a tractor’s disc is using a bumper style jack to support the tongue of the disc.
  • Jack may not support the weight and could slip off or come loose.
  • Use proper equipment.
  • Use more than one jack.
A worker is riding on the access platform (tractor is equipped with ROPS).
  • Worker may fall under the tractor and get run over.
  • Worker may fall and get hurt.
  • Employer could get a serious citation for allowing a rider without adequate riding facilities T8CCR3650.
  • One worker per seat only.
Worker is shredding some branches with half his body leaning inside the funnel.
  • Gloves/clothes could be caught on a branch bringing worker into the funnel.
  • Worker may lose balance and fall into the funnel.
  • Feed branches from a safe distance.
  • Employee training on safe operation.
  • Use an extension tool if needed.
Mechanic is oiling a hay bailer while it is running.
  • Gloves/clothes could be caught in moving parts.
  • May be a violation of Cal/OSHA regulation if not done in accordance with a good lockout, tagout program.
  • Stop equipment before working on it, even when it seems to be a small problem.
A worker is reaching to remove a clog from wagon‘s chain while the wagon is running.
  • Citation under the lockout, tagout program
  • See Title 8/3441 and Title 8/3314.
  • Stop equipment before working on it, even when it seems to be a small problem.
  • Develop and follow a lockout, tagout program.

Session #3 – Additional Information – Lockout/Tagout

Uncontrolled energy causing the sudden and unexpected movement of equipment and/or machinery can kill or injure you!

The OSHA standard for the control of hazardous energy, better known as “Lock-out/Tag-out” (Title 29, Code of Federal Regulations, Part 1910.147) refers to specific practices and procedures to safeguard employees from the unexpected startup of machinery and equipment, or the release of hazardous energy during service or maintenance activities. In addition, Part 1910.333 sets forth requirements to protect employees working on electric circuits and equipment.

If your work involves activities such as set-up, un-jamming, repairing, cleaning, servicing and adjusting equipment and/or machinery, it is important to consider the following:

  • Turning off a switch is not the same as lockout because there is still energy in the switch. If there is a short at the switch or the machine is accidentally turned on, it will energize and cause it to run.
  • Remember that many types of hazardous energy sources such as springs, air, oil, and steam or water pressure can cause sudden and unexpected movement of machines and hurt or kill you.
  • Sometimes, machines and equipment must be serviced with the power on. If so, you must minimize your hazards by using extension tools or other methods to protect you from injury. Be sure to get trained on how to use these tools or methods and always use them properly.

The Lockout/Tagout standard establishes the following requirements to employers:

  • Develop, implement and enforce an energy control program.
  • Use lockout devices for equipment that can be locked out. Tagout devices may be used in lieu of lockout devices only if the tagout program provides employee protection equivalent to that provided through a lockout program.
  • Ensure that new or overhauled equipment is capable of being locked out.
  • Develop, implement and enforce an effective tagout program if machines or equipment are not capable of being locked out.
  • Develop, document, implement and enforce energy control procedures.
  • Use only lockout/tagout devices authorized for the particular equipment or machinery and ensure that they are durable, standardized and substantial.
  • Ensure that lockout/tagout devices identify individual users.
  • Establish a policy that permits only the employee who applied a lockout/tagout device to remove it.
  • Inspect energy control procedures at least annually.
  • Provide effective training as mandate for all employees covered by the standard.

For more information, go to www.dir.ca.gov

Session #4 – Animal Safety (Approximate time 45 minutes/could be divided into two meetings)

Session Objective

At the end of this session, participants will be able to:

  • Identify and evaluate different methods for reducing or eliminating animal safety hazards.

Materials Needed

  1. Copies of the fotonovela “How Pablo Learned to Work Around Cattle” (one per participant)*
  2. Flip chart and markers (if possible)

Prior to the Session

  • Make arrangements for an experienced worker to demonstrate the concepts learned during this session. You will need this worker to help you during the second part of the session.
  • Select a tame animal to use during the demonstration. When selecting the animal, choose one that is familiar with the handler conducting the demonstration.
  • Arrange for a space for the demonstration that is large enough for the group to observe the animal and its handler without other distractions that may cause extra stress to the animal.

Conducting the Session

  1. Introduction – 5 minutes
    • Explain that most of this session will take place outside with a live animal. Remind them that cows respond better when they are not stressed; therefore, it is important for them to remain quiet, avoiding sudden movements during the demonstration part of the session.

  2. Exercise – 25 minutes
    • Distribute the copies of the fotonovela, and ask for volunteers to read it aloud or read it yourself, asking participants to follow along.
    • After the story is read, reinforce the key points by asking the following questions. Once participants have had a chance to volunteer their ideas, provide the information contained in the boxes.
    How Pablo Learned to Work Around Cattle – Summary

    Pablo is a young worker. During his first week working at a dairy, he hurt his arm while helping move some cows. José, an experienced worker, realizes Pablo needs more training. After getting Pablo aid for his injury, José reviews four basic principles that make working around cattle safer for the worker: (1) the blind spot; (2) the flight zone; (3) signs of stress; and (4) the point of balance.

    Ask participants – Who can explain what the point of balance is? Where is it located? And why it is important?

    • Let participants respond and then make sure the points in the boxes are covered. (You may write the group’s answers on the flip chart paper.)
    cow picture
    Point of Balance

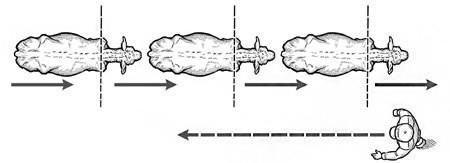
    Animals tend to walk in the opposite direction of the handler. The point of balance is at the animal's shoulder. Animals move forward if the handler stands behind the point of balance. They will move back if the handler stands in front of the point of balance. It is not necessary to prod animals; they will move by themselves when the handler walks past the point of balance, in the opposite direction of the animals. If the animals are moving by themselves through the chute, leave them alone. You may occasionally tap the side of the chute to keep them moving.

    Ask participants – Who can tell me what the flight zone is and why it is important?

    • Let participants respond and then make sure the points in the box below are covered. (You may write the group’s answers on the flip chart paper.)

    flight zones around cows

    Flight Zone

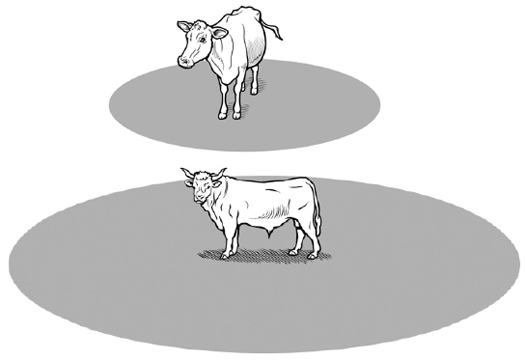
    The flight zone is the animal’s personal space; it is an imaginary area within which the animal feels safe. The size of the flight zone is determined by the animal. A completely tame animal will have no flight zone and can be approached and even touched. The more untamed the animal is, the larger its flight zone will be. Bulls usually have larger flight zones than cows.

    Usually, animals will start to move away when the handler enters their flight zone.

    Ask participants – Who can explain what the blind spot is and why it is important?

    • Let participants respond and then make sure the points in the box below are covered. (You may write the group’s answers on the flip chart paper.)

    picture of cow's vision areas and blind spot

    Blind Spot

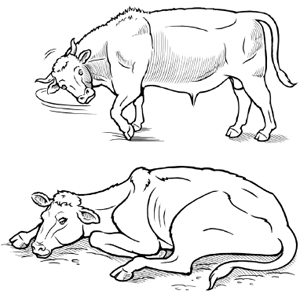
    While humans can see only within 180 degrees, cattle have panoramic vision and can see 300 degrees. Their wide-angle vision enables them to see around them without turning their heads except for a small point directly behind their rear. This point is called the blind spot.

    Panoramic vision causes everything to appear bent and distorted. Cows also have poor depth perception and may be fearful of shadows or dark areas; shadows may look like holes to them. To better focus their view in front of them, cattle will lower their heads for a closer examination.

    Always approach a cow/bull from the shoulder and speak calmly as you approach.

    Remember to never approach cattle from behind, even if it is a tame animal. A startled cow may kick you.

    Ask participants – Who can tell me what the signs of stress are and why are they important? Have you seen stressed animals?

    • Let participants respond and then make sure all of the following points are covered. (You may write the group’s answers on the flip chart paper.)

    cows

    Signs of Stress
    Ears pointing Tail tucked between legs
    Looking sick or hurt Looking afraid
    Butting Neck curved
    Bellowing Shaking head
    Kicking Pawing
    Displaying broadside view Snorting
    Raised ears Flicking or raised tail
    When working with cattle, it pays to keep calm and be patient, slow down, work quietly, and use common sense.
    Avoid excessive noise. It is easier to work around non-stressed animals. In addition, milk production increases when animals are calm.
    Cows/bulls are herd animals; this herding instinct provides a sense of safety. Singling animals out causes them anxiety. As they feel safer in groups, take advantage of this natural instinct by working from the front of the group; the others will follow the lead.
    Generally, cattle are gentle animals; however, a stressed animal may cause you harm. When an animal feels threatened, it may kick, push, bite or attack. Staying alert at all times and following good handling practices will reduce your chances of injury.

  3. Demonstration – 15 minutes
  4. (This part of the session can be scheduled on a different day)

    Before starting the demonstration:

    • Remind participants that by taking time to understand animals’ behavior you can better predict their actions and become a safer handler.
    • Remind the group to stay calm during the demonstration and keep their voices low to reduce the stress of the animal.
    • Explain that an experienced worker will demonstrate two of the concepts you just reviewed – the flight zone and the point of balance.
    • Take the group to the area you pre-arranged for the demonstration.
    • Have the experienced worker demonstrate:
      1. Flight zone – the worker should approach the animals slowly and quietly; the animals will respond by moving away, always keeping an eye on the handler. Ask the handler to repeat the exercise a few times, always trying not to stress the animals too much.
      2. Point of balance – the worker will approach an animal from the shoulder and move towards its tail. The animal will move in the opposite direction, and the others will follow as the worker moves from animal to animal. The worker will repeat the exercise in the opposite direction.

  5. Sum up – 5 minutes
    • Ask the group to share what they think are the key points of this module. Answers may include:
      • Good handling practices reduce the probabilities of being injured.
      • Cattle respond better to the handler when they do not feel scared, agitated or threatened.
      • The first thing a cow will try to do when feeling uncomfortable is to move away and keep its distance.
      • Bulls are territorial and workers should be extra cautious with them, even when they seem to be tame.
      • Look at the animal’s tail and ears to identify signs of stress.
    • Remind participants when the next session will be conducted.

    diagram where cows move right and the man moves in the reverse direction

Session # 5 – Planning for Emergencies (Approximate time 45 minutes)

Session Objective

At the end of this session, participants will be able to:

  • State what should be done in different kinds of emergencies.

Conducting the Session

  1. Introduction – 5 minutes
    • Ask participants – “In this session, we are going to talk about emergencies at work. What does the word emergency mean to you?”

      An emergency at work is something hazardous that is not planned – it is unexpected. It can be very serious and may cause a great deal of harm to employees or the public. It may also cause damage to the workplace itself. Emergencies may be natural events or man-made.

  2. Discussion – 20 mi
    • Ask participants – “What are some examples of emergencies that can occur in our workplace?”

      Some of their answers may be:

      • Being kicked, bitten or pinned by the animals.
      • Accidents while using machinery.
      • Falls.
      • Tractor rollover.
      • Fires.
      • Earthquakes.
      • Chemical spills.
      • Accidents within confined spaces.
      • Tell participants – Every workplace should have a plan for dealing with different kinds of emergencies, such as accidents, fires, earthquakes, floods, and chemical spills. Think about our dairy and answer these questions. Be specific:

        Note to instructor: After the answers are discussed, tell the group what procedures they should follow in different emergencies they may face.

      • Who is in charge during an emergency?
      • Do you know what to do in case of an emergency?
      • What are your responsibilities during an emergency?
      • If someone gets hurt, what should you do?
      • If there is an emergency, what phone numbers do you call?
      • Where can you find posted the emergency numbers?
      • Where is a phone you can use in case of emergency?
      • Are there radios available while working in hard-to-reach areas of the facility?
      • Which people in the workplace know first aid?
      • Where are the first aid kits located?
      • Do you know how to obtain emergency medical care?
      • Where are the fire extinguishers? How do they work?
      • Do you know what to do with the animals if a natural disaster strikes?

  3. Sum-up - 5 minutes
  • Ask the group to share what they think are the key points of this module. Answers may include:
    • Knowing what steps and measures are to be taken during an emergency increases the chances of responding adequately.
    • It is normal to feel anxious or shocked after an emergency. Different people react differently in the same situation, and some may take longer to return to normal than others.
  • As this session is the last of the series, thank them for their participation and remind them that safety is everyone’s business.

Tips for Planning for Emergencies

Management can make the workplace safer:

  • Develop an escape plan for fires, floods, earthquakes, and chemical spills.
  • Designate a meeting area in case of emergency.
  • Train employees on the escape plan.
  • Train employees on how the fire alarm works and how to use fire extinguishers.
  • Provide employees with the phone numbers for emergencies (9-1-1) and the poison control center. Provide employees with the communication equipment (cell phone or radio) to make such contacts.
  • Provide employees with first aid training and supplies to provide prompt medical attention while waiting for the first responders to arrive.

Employees can follow safe work practices:

  • Know how to reach owners/managers in case of emergency.
  • Keep emergency phone numbers with them, including their doctor’s phone number.
  • Know where to find fire extinguishers and first aid kits.
  • Know where the emergency exit and designated meeting areas are located.
  • Know what to do with animals in case of fire or earthquakes.
  • Be aware of first aid practices.

Background Information

Safety Pays

Taking risks is part of running a successful business; you take financial risks when you purchase new equipment, grow your herd, or make changes in your marketing to stay competitive. But some risks are just not worth the gamble. One of these is risking the safety and health of those who work for you. By implementing a strong safety and health program, you can accomplish three important things at once: prevent human suffering; save money; and promote a positive image.

Every dollar invested in workplace safety results in $3 or more in savings. Safety is an investment, not a cost. —Insurance industry study

  1. Preventing Injuries and Their Impact
  2. One serious injury in your workplace can have a devastating impact on your employees, their families and you. By preventing that serious accident, you can help to:

    • Save lives.
    • Reduce workers’ pain and disability.
    • Reduce the impact of workers’ injuries on their families and communities.
    • Protect co-workers from the stress of filling in for people who are off the job.

  3. Saving Money
  4. For every dollar spent on the direct costs of a worker’s injury or illness (medical expenses and lost wages), it is estimated that you, the employer, will spend at least as much again to cover the indirect and hidden costs. In most cases, you may spend four to six times more. Consider what one injury with lost workdays would cost you in terms of:

    • Productive time lost by the injured employee.
    • Productive time lost by employees and supervisors attending the accident victim.
    • Clean-up and start-up of operations interrupted by the accident.
    • Time and cost for repair or replacement of any damaged equipment or materials.
    • Overtime costs when other workers must fill in.
    • Fines for violating regulations.
    • Cost of time spent on the investigation.
    • Cost of completing paperwork generated by the incident.
    • Time to hire or to retrain others to replace the injured worker until his/her return.
    • Loss of skills of a valuable employee.
    • Low worker morale and perhaps less efficiency and increased absenteeism.
    • Increased workers’ compensation insurance rates.

  5. Promoting a Positive Image
  6. An effective health and safety program can also make your business stand out. It can:

    • Increase worker morale (show that workers’ well-being comes first) and decrease turnover.
    • Attract top employees.
    • Help the company stand out in the community as a caring employer.
    • Improve client and investor relationships by demonstrating an excellent safety record.
    • Avoid bad publicity from fines, accidents, and incidents.

A big accident or fine may be a rare event, but it can cost a great deal in terms of public image. We had a disastrous experience with OSHA and paid dearly for it. We never want to be embarrassed like that again. —Safety Manager

References

American Society of Safety Engineers. White Paper: The return on investment for safety, health and environmental management programs. Des Plaines, IL, ASSE, 2002. McDonald, C. Workplace safety pays, survey shows, National Underwriter, Sept. 17, 2001:105, 38:ABI/INFORM Global pg 26. Schulte, P.A. Characterizing the burden of occupational injury and disease. Journal of Occupational and Environmental Medicine, 47(6):607-622, June 2005.

Portions of this factsheet were adapted from the Guide to Developing Your Workplace Injury and Illness Prevention Program, Cal/OSHA Consultation, rev. 2005.

Taking the Safest Approach

pyramid showing steps to 1. remove or isolate the hazard, 2. Improve work practices, 3. Use protective clothing and equipment
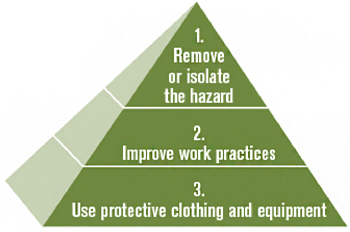
Many hazards exist in the dairy industry, and steps can be taken to improve safety dramatically. As the safety pyramid below shows, there are three main ways to protect workers.

The best way to prevent injuries is to remove the hazard altogether (#1 below), or keep it isolated, away from workers, so it cannot hurt anyone. This way the workplace itself is safer.

Removing the hazard can sometimes be the most difficult solution, or take the longest time to implement. You may need other solutions to protect you in the meantime. These include improving work practices (#2) and using protective clothing and equipment (#3).

Example

Chemicals like milking equipment cleaners can splash into a worker’s eyes. What controls can be put in place to keep workers from getting hurt?

  1. Is there a way to remove the hazard? Use a less toxic product that causes fewer health problems. This is the safest approach.
  2. What improvement in work practices would help? Train workers on the importance of pouring chemicals from a low height to avoid splashing.
  3. What protective clothing or equipment would help? Use goggles to prevent any splashes from getting into the eyes.

What Health and Safety Training is Required?

The laws and regulations cited in this booklet are available on line.

  • The laws are in the California Code of Regulations (CCR). For the laws, go to www.leginfo. ca.gov (link to: California Law).
  • For the regulations, go to www.oal.ca.gov (link to: Cal.Code Regs.).

This Dairy Safety Training Program can help you provide basic health and safety training to your employees, but additional training may be required. An overview of training requirements under the Injury and Illness Prevention Program (IIPP) standard, Hazard Communication standard, Emergency Action Plan standard, and other Cal/OSHA standards follows.

Overview of Training Requirements

All California employers are required to provide health and safety training to all of their employees. The broadest training requirements fall under Cal/OSHA’s Injury and Illness Prevention Program (IIPP) standard (required under California Labor Code -Section 6401.7. See http://www.dir.ca.gov/ Title8/3203.html). Training must be provided to all workers on the hazards in your workplace:

  • When they start working for you;
  • When they’re given a new job assignment; and
  • Whenever new procedures or equipment are introduced.

Two other standards that affect most workers are Cal/OSHA’s Hazard Communication standard, which requires training on any chemicals to which employees may be exposed, including cleaning products, and the Emergency Action Plan standard (this standard is not mandated for dairy operations, but if you have one, it has to meet the standard, and these procedures may be incorporated into your Illness and Injury Prevention Program). These three standards are summarized in this section. However, this booklet is not designed to ensure full compliance with all Cal/OSHA standards, so be sure to check the relevant standards yourself, as needed.

Cal/OSHA requires training for other specific standards, such as fall protection, forklifts, and hearing protection. To find out which training requirements affect your employees, go to: www.dir.ca.gov/dosh/dosh_publications/TrainingReq.htm

Employees also need bloodborne pathogen training if they are at risk of coming into contact with human blood or other potentially infectious materials. For more information, go to: www.dir.ca.gov/dosh/dosh_publications/dontrisk.html

Injury and Illness Prevention Program Standard [Title 8 CCR §3203]

The Injury and Illness Prevention Program (IIPP) standard requires every California employer to establish, implement, and maintain an effective IIPP to promote health and safety in the workplace.

An IIPP must be a written plan that includes all of the following elements:

  • Management commitment and assignment of responsibilities. Someone with the authority and responsibility for the program must be identified and given management’s full support to implement the program.
  • System for ensuring that employees follow safe and healthy work practices. This should include a plan for providing re-training to employees when necessary.
  • Safety communication system. Employers must communicate with employees about safety in a language they can understand and in a manner that does not depend on employees’ reading and writing skills. Communication systems may include safety meetings, written materials, health and safety committees, or other methods that encourage employees to share their safety concerns or suggestions without fear of being fired or punished.
  • Hazard identification and control. There must be specific procedures for identifying, evaluating, and correcting hazards, including scheduled periodic inspections of the workplace. Hazards must be corrected as soon as they are found, or as quickly as possible, with priority given to the most serious hazards.
  • Incident investigation. There must be a process for investigating work-related injuries and illnesses. Written documentation of incidents should be kept, indicating why they occurred and what actions will be taken to prevent them in the future.
  • Training. Training must be provided to all employees when the IIPP is established, to all new employees when they start, and to anyone with a new job assignment. Whenever new substances, processes, procedures, or equipment are introduced in the workplace, employees must receive training about them.

The written IIPP must be made available to all workers. Records must be kept to document that there is an effective program in place. These records must include scheduled inspections, actions taken to correct problems, and types, dates, and providers of training. Please note that while all employers need to have written IIPPs, there are some exceptions to the documentation requirements if you have fewer than 10 employees.

See the Resources section for more information on writing an IIPPs.

Hazard Communication Standard [Title 8 CCR §5194]

This Cal/OSHA regulation requires employers to provide information to employees about the chemicals and other hazardous substances to which they may be exposed at work by providing Material Safety Data Sheets (MSDSs), chemical labels, and training.

MSDS. Manufacturers of products containing hazardous ingredients must prepare MSDSs for those products and distribute them to purchasers (such as employers). The MSDS identifies the manufacturer, contents, toxicity, and safety hazards of the chemical product. It describes routes of exposure (skin, inhalation, or ingestion) and explains how to prevent health problems. Employers must have an up-to-date MSDS for each hazardous product they use and must make MSDSs available to employees. Employers can get MSDSs by calling their chemical supplier, or, in some cases, from the Internet. Some MSDSs are available in several languages.

Chemical Labels. Employers must make sure that all products with hazardous ingredients are properly labeled. Original labels must include the identity of the hazardous substance (matching the corresponding MSDS), appropriate hazard warnings, and the name and address of the manufacturer or importer. This labeling requirement applies to all containers, even those into which a smaller amount of the chemical has been poured.

Training. Employers are required to train workers about the hazardous substances used at work, their health effects, how to work safely with them, how to read an MSDS, and where the MSDSs are kept. The training must also cover how accidental chemical releases are detected and what emergency procedures should be followed in case of a spill or leak.

Employers are required to describe in writing the elements of the workplace’s hazard communication program and how the workplace will comply with this Cal/OSHA standard. This written program must be available at the worksite and communicated to all affected workers.

Emergency Action Standard [Title 8 CCR §3220]

Note: This standard is not mandated for dairy industry operations, but if you have one, it has to meet the standard.

This Cal/OSHA regulation sets minimum requirements for Emergency Action Plans, such as evacuation plans. It requires employers with more than 10 employees to have such a plan in writing.

Employers with 10 or fewer employees do not need to have a written plan, but they do need to meet all the other requirements of the Emergency Action Plan and must communicate these elements to employees. Regardless, it is a good idea to plan for emergencies.

The Emergency Action Plan must include the following elements:

  • Emergency escape procedures and routes.
  • Procedures explaining how critical operations will be maintained during and after an emergency (if necessary).
  • Procedures to account for all employees after an emergency evacuation have been completed.
  • Rescue and medical duties for staff. Employees should know who is trained in first aid or CPR and where to get medical attention, if needed.
  • How employees should report fires and other emergencies.
  • Who is responsible for coordinating emergency response.

Alarm system. The employer must have an alarm system that can be seen, heard, and understood by all employees.

Evacuation. The plan should designate inside shelters, exits, evacuation routes and procedures, and outside meeting places. Exits and evacuation routes should be checked periodically to be sure they are not blocked.

Training. The employer must designate and train key staff to assist in evacuation procedures. All employees need to understand what to do during different kinds of emergencies. Employees should be trained so that they understand their responsibilities during an emergency; the alarm system and “all clear” announcements; where to gather during an emergency; how to report an emergency; what to do if there is a chemical spill; and who has training in first aid and training in the use of fire extinguishers.

Basics of Cal/OSHA

Cal/OSHA is the California state program responsible for protecting the health and safety of workers. Cal/OSHA makes sure that employers follow occupational safety and health regulations and keep the workplace safe.

All non-federal workers in California are protected by Cal/OSHA regulations (often called standards). This includes public employees and immigrant workers who are not legally authorized to work in California.

Employer Responsibilities Under Cal/OSHA

Employers must:

  • Provide their employees with work and workplaces that are safe and healthy.
  • Be aware of the hazards their employees face on the job, train every worker about the specific hazards on each job assignment, and keep records of this training.
  • Correct any hazardous conditions that they know may result in serious injury to their employees. Failure to do so could result in criminal charges, monetary penalties, and even jail time.
  • Comply with all applicable Cal/OSHA standards, including training requirements.
  • Notify the nearest Cal/OSHA office of any serious injury or fatality that occurs on the job or any serious illness caused by the job. This must be done immediately after calling for emergency help to assist the injured worker. Failure to do so may result in a $5,000 penalty.
  • Display Cal/OSHA’s Safety and Health Protection on the Job poster so that workers are aware of basic rights and responsibilities. This poster is also available in Spanish and other languages.

The Cal/OSHA Consultation Service provides free technical assistance to employers on health and safety issues. Consulting services include on-site visits (no fee), assistance in complying with Cal/ OSHA standards, educational seminars, and publications.

See the Resources section for information on how to contact Cal/OSHA and Cal/OSHA Consultation Services.

Safer Jobs for Teens

If you hire teenagers, you need to know that there are special laws related to teen work. Here’s what you can do to prevent injuries to your teen workers. The measures you take to keep teens safe will help protect all employees. Here are six steps to safer teen jobs:

1. Know the Law

  • Understand the California child labor laws. These prohibit teens from working late and/or long hours, and doing especially dangerous work. • Understand Cal/OSHA’s workplace safety and health regulations. These are designed to protect all employees, including teens, from injury.

2. Check Your Compliance

  • Make sure teen employees are not assigned work schedules that violate the law or given prohibited job tasks like operating heavy equipment or using power tools.

3. Check Work Permits

  • Workers under 18 must apply for work permits at their school or school district office before beginning a new job. Work permits are not required for those who have graduated from high school or passed the high school equivalency exam.

4. Stress Safety to Supervisors

  • Make sure frontline supervisors who give teens their job assignments know the law. Encourage supervisors to set a good example. They are in the best position to influence teens’ attitudes and work habits.

5. Set up a Safety and Health Program

  • Make sure all jobs and work areas are free of hazards. The law requires you to provide a safe and healthy workplace. Under Cal/OSHA regulations, every workplace must have an Injury and Illness Prevention Program (IIPP). Involve every worker in the program, including teens. Find out if there are simple low-cost safety measures that can prevent injuries.

6. Train Teens to Put Safety First

  • Give teens clear instructions for each task. Provide hands-on training on the correct use of equipment. Show them what safety precautions to take. Point out possible hazards. Give them a chance to ask questions.
  • Observe teens while they work, and correct any mistakes. Retrain them regularly.
  • Encourage teens to let you know if there is a problem or if directions are unclear. Make sure teens feel free to speak up.
  • Prepare teens for emergencies such as accidents, fires, dangerous or violent situations. Show them escape routes and explain where to go if they need emergency medical treatment.
  • Supply personal protective equipment when needed – goggles, safety shoes, masks, hard hats, gloves. Be sure that teens know how to use it.

What Work Does The Law Prohibit Teens From Doing?

Child labor laws restrict the kinds of work teens under the age of 16 can do in agriculture, with even further restrictions for youth under 12. Youth of any age may work at any job, at any time on a farm owned or operated by their parents. However, children under 12 may not work near: 1) moving farm equipment; 2) pesticides or other chemicals; or 3) water hazards, such as irrigation canals.

In California no worker under 16 may: 1) handle or apply pesticides; 2)drive, ride or assist in operating a tractor or forklift; 3)drive any vehicle for transporting passengers; 4)use powered equipment such as a chain saw, hay mower, hay baler or cotton picker; 5)work on a ladder over 20 feet; or 6)work inside a silo.

What Hours May Teens Work in California?

This table shows the hours that teens may work in California.

Some school districts may have more restrictive regulations. Also, there are some exceptions for teens in Work Experience Education programs.

Work Hours for Teens

  Ages 12-15 Ages 16-17
Work Hours

Not before 7 a.m. or after 7 p.m. during the school year

Not during school hours

7 a.m. to 9 p.m. during the summer

Not before 5 a.m. or after 10 p.m. on school nights

Not before 5 a.m. or after 12:30 a.m. when there is no school the next day

Maximum Hours When School is in Session

18 hours a week, but not over:

  • 3 hours a day on school days
  • 8 hours a day Saturday-Sunday and holidays

48 hours a week, but not over:

  • 4 hours a day Monday- Thursday
  • 8 hours a day Friday to Sunday and holidays
Maximum Hours When School is Not in Session
  • 40 hours a week
  • 8 hours a day
  • 48 hours a week
  • 8 hours a day

For more information on employing teens, visit the Young Workers Safety Website at www.youngworkers.org.

How Adults Learn Best

Adults learn best when the training:

  • Is relevant. It reflects “real world” experiences and meets participants’ own educational needs. People are motivated to learn when they see that the material is important to them and will benefit them.
  • Respects participants. It respects people’s experience, knowledge, and skills. Adults prefer to have some control over their own learning experience and want to be treated as equals.
  • Builds on previous learning. It recognizes that we all learn best when we can relate what we’re learning to what we already know. This means that you need to know the level of your audience so you don’t pitch information at comprehension levels too low or too high. Assess your audience’s knowledge and experience and then build on top of what they already know.
  • Uses diverse methods. It uses many different activities and teaching techniques. This keeps the training interesting. Learners are all different. In any group, there will be people with a range of learning styles. Some people learn best by seeing, some by listening, and some by doing handson activities. There may also be people with different literacy or language skills.
  • Is participatory and interactive. Above all, people learn best when they are actively engaged in their own learning and are not passive recipients of information. Effective trainings avoid long lectures and get everyone involved in questioning, discussing, problem-solving, and practicing new skills through hands-on activities or other methods.
  • Focus on what is essential to know. Since your training time is limited, you need to determine what information is crucial to improve health and safety in the workplace. Ask yourself:
    • Why do workers need to know this?
    • In what way will this information prepare the person to stay safe at work?

Tell me, I forget. Show me, I remember. Involve me, I understand. —Anonymous

Glossary of Terms

  • Blind Spot – Cattle have panoramic vision. They can see 300 degrees around them, with a blind area directly in the back of their heads.
  • Confined Spaces – Any space that has a limited or restricted means of entry/exit.
  • Flight Zone – Also called comfort zone, it is an area surrounding an animal. If a person enters the flight zone of an animal, the animal will move away. The size of the flight zone depends upon the tameness of the animal; untrained animals have a very large flight zone, and tame animals may have a small zone or none at all.
  • Hazard – Anything at work with the potential to harm, either physically or mentally. Anything that poses a level of threat.
  • IIPP – Illness and Injury Prevention Program. It is a Cal/OSHA Standard that requires every California employer to establish, implement and maintain an effective program to promote health and safety in the workplace. It must be a written plan.
  • MSDS – A Material Safety Data Sheet is a compilation of information required under the OSHA Hazard Communication standard which identifies hazardous chemicals, health, and physical hazards, exposure limits, and precautions. The supplier or manufacturer provides it to purchasers. It is available in several languages.
  • Tame – A domesticated, docile animal.
  • Point of Balance – Typically around the shoulder of the animal, it is a point of reference for the handler to move the animal. To move the animal forward, the handler should stand behind the shoulder. To move it backward, the handler should stand in front of the point of balance.
  • PPE (Personal Protective Equipment) – The equipment to be worn when performing duties that may involve possible occupational exposure to biological, chemical and safety hazards. Examples of PPE include masks, goggles, gloves and aprons.
  • Standard (Cal/OSHA) – Cal/OSHA regulation that states what employers must do to protect workers. There are two kinds of standards, specific and general, and they cover a variety of workplace hazards. Cal/OSHA standards are found in Title 8 of the California Code of Regulations.

For More Information

Resources For Writing Your IIPP

Cal/OSHA Guide to Developing Your Workplace Injury and Illness Prevention Program (IIPP)

This manual describes the employer’s responsibilities in establishing, implementing, and maintaining an IIPP (see page 38). It also outlines steps that can be taken to develop an effective program that helps assure the safety and health of employees on the job. The manual includes checklists for selfinspection. To obtain a copy of the manual, contact your local Cal/OSHA area office, call Cal/OSHA Consultation at (800) 963-9424, or download it at: www.dir.ca.gov/dosh/dosh_publications/iipp.html

Resources from Your Workers’ Compensation Insurance Broker

Most workers’ compensation insurers offer loss control assistance, including help with putting together your IIPP. Contact your insurance broker to find out what resources may be available from your insurance company. You can also download a sample IIPP from the State Compensation Insurance Fund (SCIF) Web site at: www.scif.com/safety/IIPP.html

Other Web Resources

Many private companies offer online programs for a fee (at least $100), with step-by-step instructions to guide you through the process of developing your IIPP. You can search for these programs online. Make sure they are in compliance with California laws.

Resources for Other Required Safety Plans

Cal/OSHA Guide to the Hazard Communication Regulation

This guide describes the employer’s responsibilities in establishing, implementing, and maintaining a Hazard Communication Program (see page 39). Contact your local Cal/OSHA area office for a copy, or download it at: www.dir.ca.gov/dosh/dosh_publications/hazcom.pdf

Federal Occupational Safety and Health Administration (OSHA) Evacuation Plans and Procedures eTool

This eTool will help small, low-hazard service or retail businesses implement an Emergency Action Plan, and comply with OSHA’s emergency standards. Download it at: www.osha.gov/SLTC/etools/evacuation/index.html

Sources of Additional Health and Safety and Workers’ Compensation Information

Cal/OSHA Consultation Service

The Cal/OSHA Consultation Service provides technical assistance to employers on health and safety issues. Consulting services include free on-site visits, assistance in complying with Cal/OSHA standards, educational seminars, and publications.

The Consultation Service is separate from the Cal/OSHA Enforcement Unit, and consultants are not involved with enforcement activities such as inspections, citations, and fines. All communications between the employer and the Consultation Service are confidential and are not shared with enforcement staff. In exchange for this free consultation, however, employers must agree to correct in a timely manner any serious hazards that are identified.

Cal/OSHA publications provide information about Cal/OSHA programs, standards, and general health and safety topics. Various types of guidelines and model IIPP plans also are available. You can obtain copies of Cal/OSHA publications by phoning (800) 963-9424 or from their Web site: www.dir.ca.gov/dosh/consultation.html

U.S. Small Business Administration

This site is the official business link to the U.S. government, managed by the U.S. Small Business Administration (SBA). It provides a single access point to government services and information to help the nation’s businesses with their operations and includes workplace health and safety information. Go to: www.business.gov/topic/ Workplace_Health_and_Safety

California Department of Public Health, Occupational Health Branch, Employer Resource Links

This site has links to various resources to help small business owners, including health and safety factsheets and other educational materials. Call OHB at (510) 620-5757, or go to: www.cdph.ca.gov/HealthInfo/ workplace/Pages/EmployerLinks.aspx

Federal Occupational Safety and Health Administration (OSHA) eTools

OSHA’s eTools are “stand-alone,” interactive, web-based training tools on occupational safety and health topics. They are highly illustrated and utilize graphic menus. Some also allow the user to ask questions and receive reliable advice on how OSHA regulations apply to their workplace. This site also has links to specific safety topics. Go to: www.osha.gov/dts/osta/oshasoft/index.html

Federal OSHA Small Business Outreach Training Program

This online guide contains links to basic information about selected topics in occupational safety and health, specifically focusing on the needs of small business. Go to: www.osha.gov/dcsp/smallbusiness/index.html

National Institute for Occupational Safety and Health (NIOSH), Safety and Health Resource Guide for Small Businesses

This guide is intended to help small business owners, employers, and managers deal with occupational safety and health concerns. It contains telephone numbers, e-mail and Internet addresses, and mailing information that will connect small businesses to government agencies, private organizations, consultants, and others who can help with occupational safety and health issues. You can also click on the “NIOSH topics” button for a comprehensive alphabetical list of NIOSH health and safety information and materials. Go to: https://www.cdc.gov/niosh/topics/smbus/guide/

North Carolina State University, Safety and Health Management Systems for Small Businesses

This is a free, online training course, funded by an OSHA-sponsored grant and developed by North Carolina State University, designed to assist small and medium-sized businesses in developing and implementing an effective safety and health management system. Go to: https://osha.ies.ncsu.edu/index.cfm?

California Commission on Health and Safety and Workers’ Compensation (CHSWC). Worker Occupational Safety and Health Training and Education Program (WOSHTEP), California Resource Centers

The WOSHTEP Resource Centers provide written materials, including factsheets, brochures, pamphlets, books, and reports. The Resource Centers also offer technical assistance, research assistance, and referrals to state and local health and safety agencies. WOSHTEP staff also offers free 24-hour classes that prepare workers to become Worker Occupational Safety and Health (WOSH) Specialists, health and safety awareness classes, Young Worker Leadership Academies, and resources and training for small businesses. www.dir.ca.gov/chswc


Disclaimer and Reproduction Information: Information in NASD does not represent NIOSH policy. Information included in NASD appears by permission of the author and/or copyright holder. More

BACK TO TOP